Tip: Start typing in the input box for immediate search results.
-
Getting Started
-
Client area
-
- Search for a domain
- Domain Contact Information - Client Area
- Change Domain Nameservers - Client Area
- Domain Renewal - Client Area
- Domain Redirect - Client Area
- Domain Aliases - Client Area
- Manage Subdomains - Client Area
- Create an Addon domain - Client Area
- Domain Auto Renewal - Client Area
- Transfer a Domain to Extilum as Unregistered User
- Transfer a Domain to Extilum as Registered User — Client Area
- Manage a Domain - Client Area
- Domain Registrar Lock - Client Area
- Get Domain EPP Code - Client Area
- Transfer a Domain from Extilum
- DNS Management - Client Area
- Show all articles ( 1 ) Collapse Articles
-
-
- Manage Privileges for MySQL Database – Client Area
- Manage MySQL Database User - Client Area
- Manage MySQL Databases - Client Area
- Manage FTP Accounts - Client Area
- Create FTP Accounts - Client Area
- Domain Redirect - Client Area
- Domain Aliases - Client Area
- Manage DNS Records with Zone editor - Client Area
- Disk Usage - Client Area
- Manage Backups - Client Area
- File Manager - Client Area
- Use IP Blocker - Client Area
- Change PHP Version - Client Area
- Manage Subdomains - Client Area
- Unban IP Address - Client Area
- Create an Addon domain - Client Area
- Show all articles ( 1 ) Collapse Articles
-
cPanel
-
- Login to cPanel
- Login to cPanel from Extilum Client Area
- The Jupiter Theme Interface - cPanel
- Switch to Paper Lantern - cPanel
- Search - cPanel
- View Server Information for cPanel
- View Statistics - cPanel
- Change Style - cPanel
- Change Language -cPanel
- Change Password - cPanel
- Update Contact Information and Preferences - cPanel
- Add User - User Manager - cPanel
- Edit User in User Manager - cPanel
- Change Password - User Manager - cPanel
- Delete User in User Manager – cPanel
- Log out of cPanel
- Show all articles ( 1 ) Collapse Articles
-
-
-
- Accessing File Manager - cPanel
- File Manager Settings - cPanel
- Create a New File or Folder in File Manager - cPanel
- Rename a file or folder in File Manager - cPanel
- Change Permissions File Manager - cPanel
- Password Protect Directory File Manager - cPanel
- Enable Leech Protection File Manager - cPanel
- Manage indices File Manager - cPanel
- Upload and download files using File Manager - cPanel
- Compress Files using File Manager - cPanel
- Extract Files using File Manager – cPanel
- Delete and Restore in File Manager - cPanel
- Search in File Manager - cPanel
- Copy Files in File Manager - cPanel
- Move Files in File Manager - cPanel
- Edit a File Using File Manager - cPanel
- HTML Editor in File Manager - cPanel
- Show all articles ( 2 ) Collapse Articles
-
- Articles coming soon
-
-
-
-
- MySQL Databases Interface - cPanel
- Add New User to MySQL Databases - cPanel
- Change a MySQL Database User's Password - cPanel
- Rename a MySQL Database User - cPanel
- Create a MySQL Database - cPanel
- Add User to MySQL Database - cPanel
- Check and Repair MySQL Database - cPanel
- Revoke User Privileges from MySQL Database - cPanel
- Delete MySQL Database - cPanel
- Delete MySQL Database User - cPanel
- Manage MySQL Databases - cPanel
-
-
- Install WordPress using Softaculous - cPanel
- Automatically Update WordPress with Softaculous - cPanel
- Backup WordPress using Softaculous - cPanel
- Manage Backup Location Softaculous - cPanel
- Manage WordPress Automated Backups Softaculous - cPanel
- Restore WordPress Backup using Softaculous - cPanel
- Clone WordPress using Softaculous - cPanel
- Stage WordPress Website with Softaculous - cPanel
- Push WordPress From Staging to Live with Softaculous - cPanel
- Remove WordPress using Softaculous - cPanel
-
-
WordPress
-
- Install WordPress using Softaculous - cPanel
- Automatically Update WordPress with Softaculous - cPanel
- Backup WordPress using Softaculous - cPanel
- Manage Backup Location Softaculous - cPanel
- Manage WordPress Automated Backups Softaculous - cPanel
- Restore WordPress Backup using Softaculous - cPanel
- Clone WordPress using Softaculous - cPanel
- Stage WordPress Website with Softaculous - cPanel
- Push WordPress From Staging to Live with Softaculous - cPanel
- Remove WordPress using Softaculous - cPanel
-
- Install WordPress Using the WordPress Toolkit - cPanel
- WordPress Toolkit Updates and Security Status Check - Cpanel
- Manage Updates using WordPress Toolkit - cPanel
- Check WordPress Integrity with the WordPress Toolkit - cPanel
- Manage maintenance mode in the WordPress Toolkit - cPanel
- Stage WordPress with the WordPress Toolkit - cPanel
- Manage Plugins using the WordPress Toolkit - cPanel
- Manage Themes using the WordPress Toolkit - cPanel
- Manage WordPress multiple sites with WordPress Toolkit
- WordPress plugins for multiple sites - WordPress Toolkit
- WordPress Themes for multiple sites – WordPress Toolkit
- Delete or Detach WordPress site – WordPress Toolkit
- Add Existing WordPress Installations to WordPress Toolkit
- WordPress Toolkit Tools - cPanel
- Back up and Restore WordPress - WordPress Toolkit
-
-
Webmail
Email Time Zone – Webmail
0 out of 5 stars
| 5 Stars | 0% | |
| 4 Stars | 0% | |
| 3 Stars | 0% | |
| 2 Stars | 0% | |
| 1 Stars | 0% |
How to Set up Email Time Zone in Webmail. This tutorial explains how to adjust time zone settings in the Horde and Roundcube webmail clients. Default settings for the webmail applications use the host server’s time zone. The exact steps to do this depend on the webmail application you are using. After you change the time zone setting, the interface displays timestamps in the new time zone the next time you log in to webmail.
Table of contents
Video tutorial – Set Up Email Time Zone in Webmail
Step-by-step tutorial – Set Up Email Time Zone in Roundcube Webmail
- Login to Webmail.
Log in to Webmail from Client Area, using a direct link, or from cPanel.
Click the Open button under the Roundcube logo.
You can check the checkbox (next to the Open button) Open my inbox when I log in.
From then on, you will see the inbox of your default email account when logging into webmail.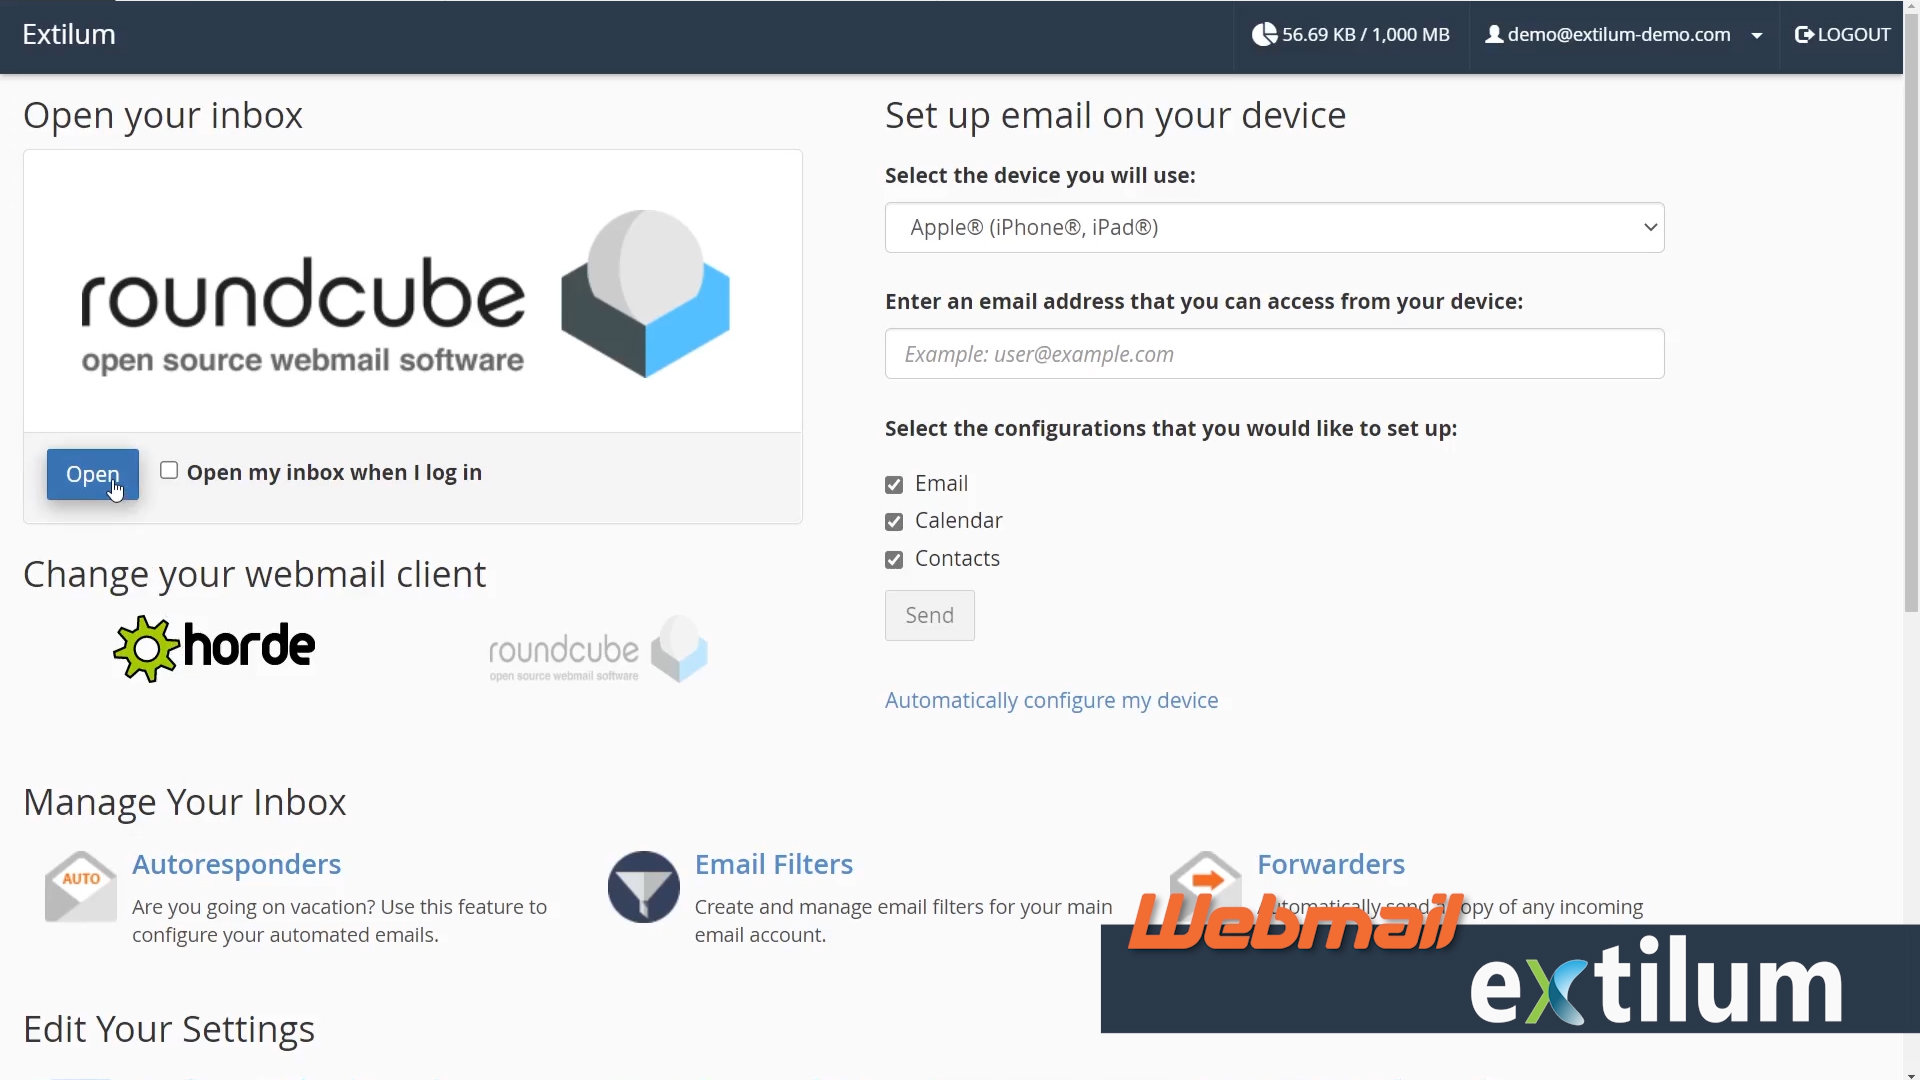
- Settings
Click the Settings icon (left sidebar).
Click the Preferences (first link under Settings title).
Click the User Interface (First link on Preferences sub-menu).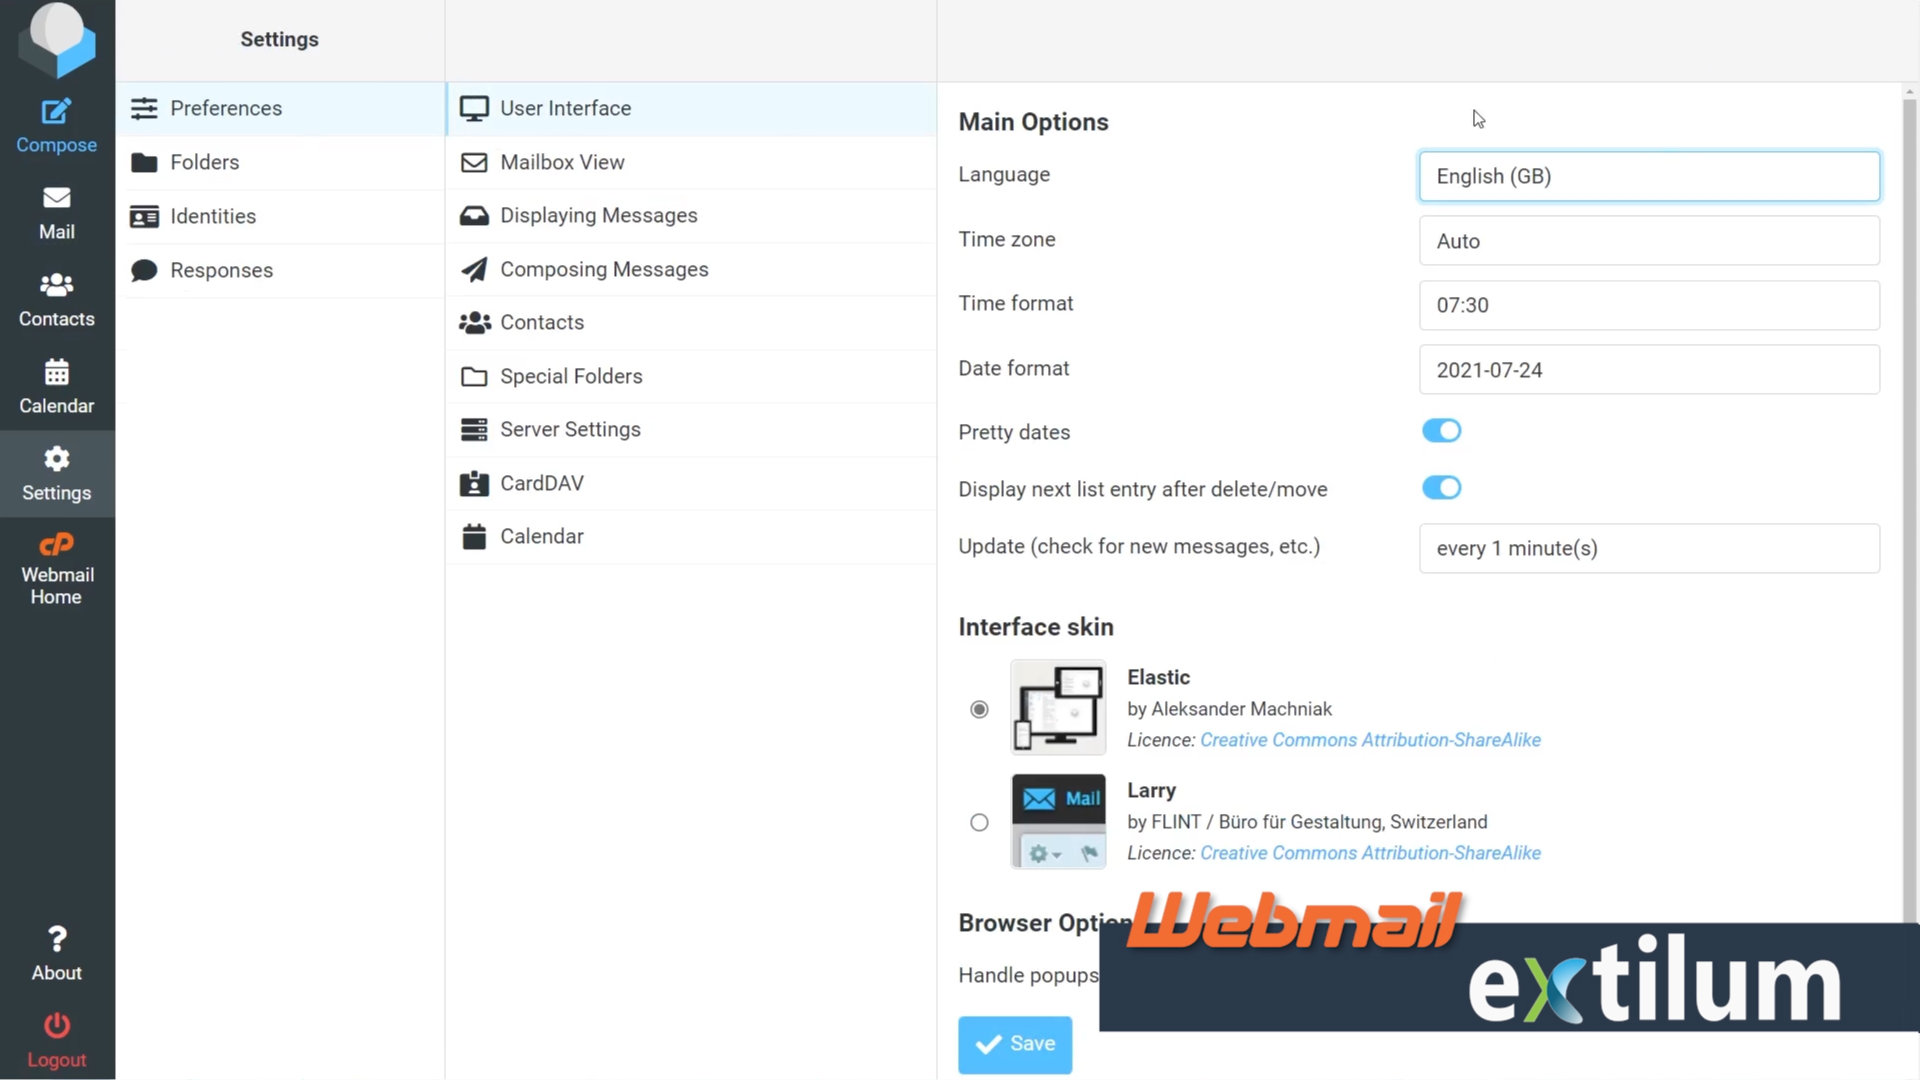
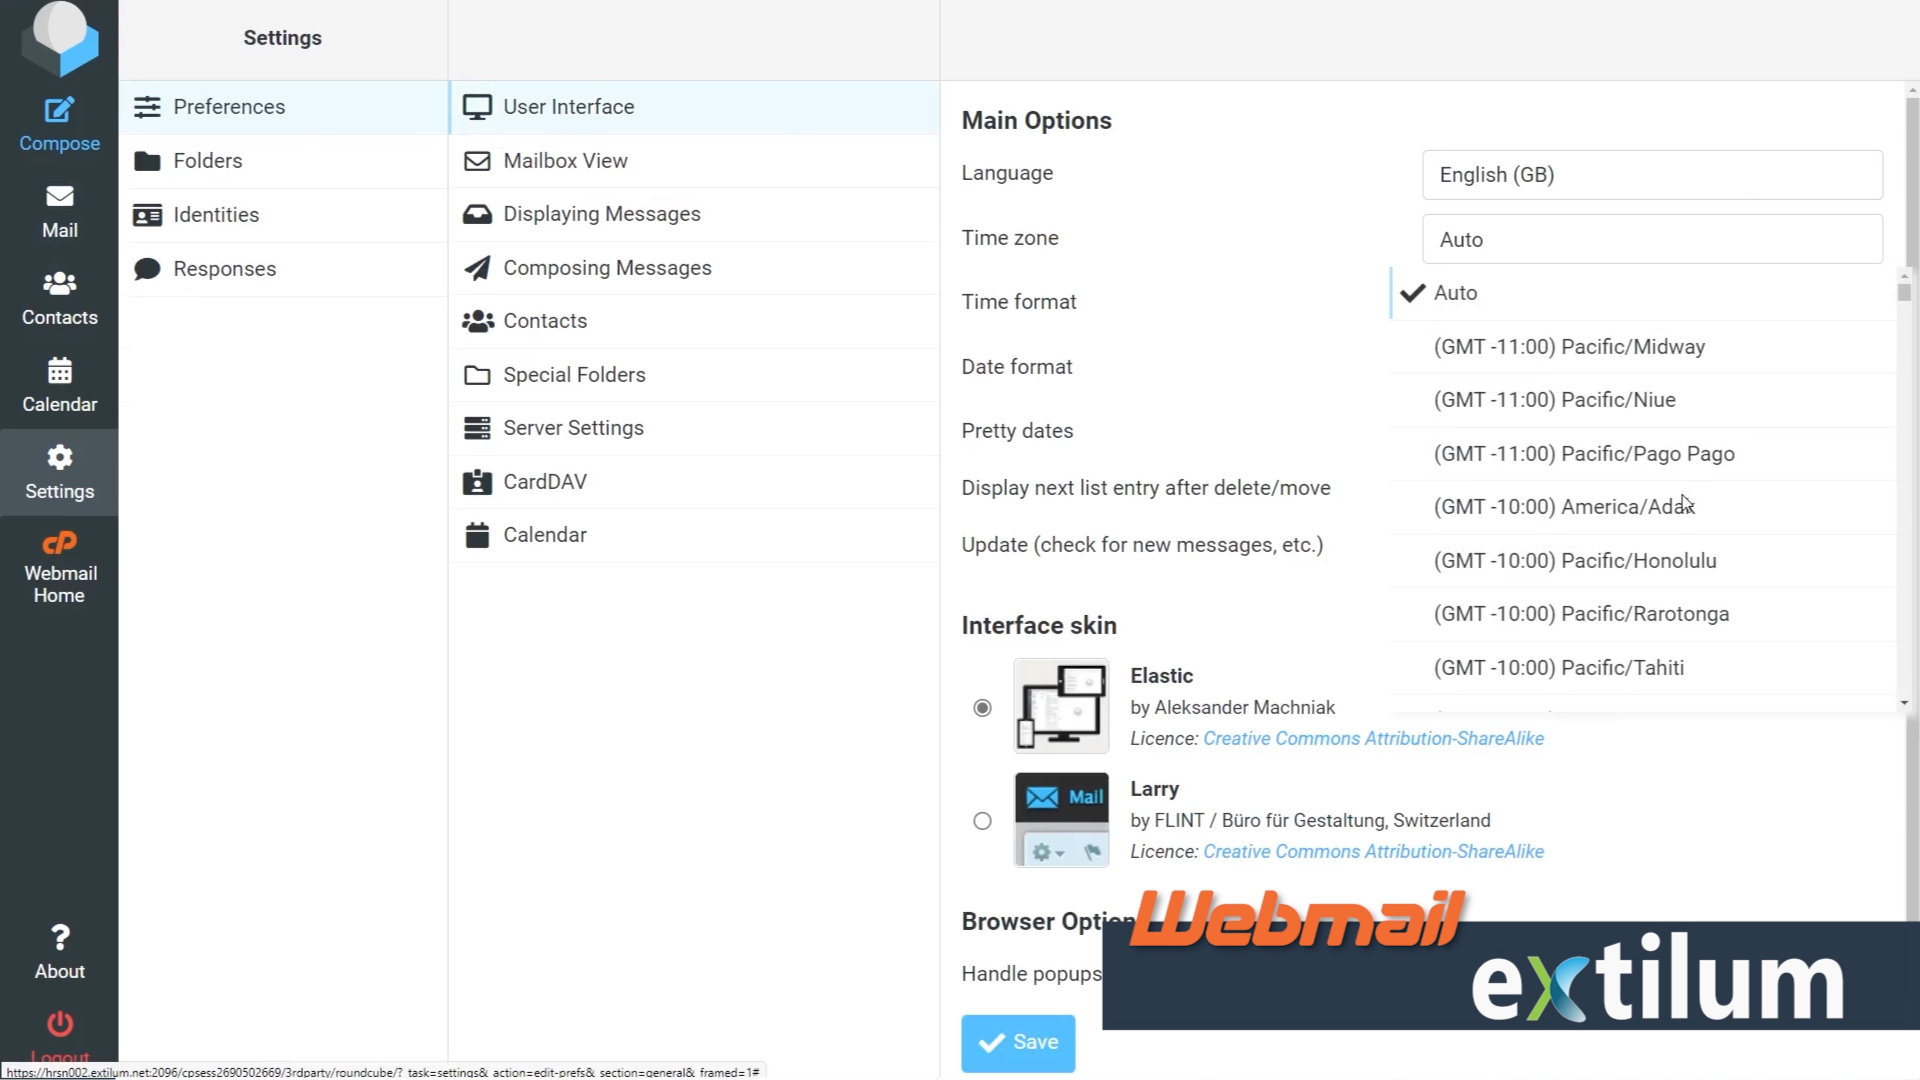
- Main options – Time zone
Select your time zone from drop-down options.
- Click Save.
You can also set up Language, Time and date format, and much more.
When finished click the Save button.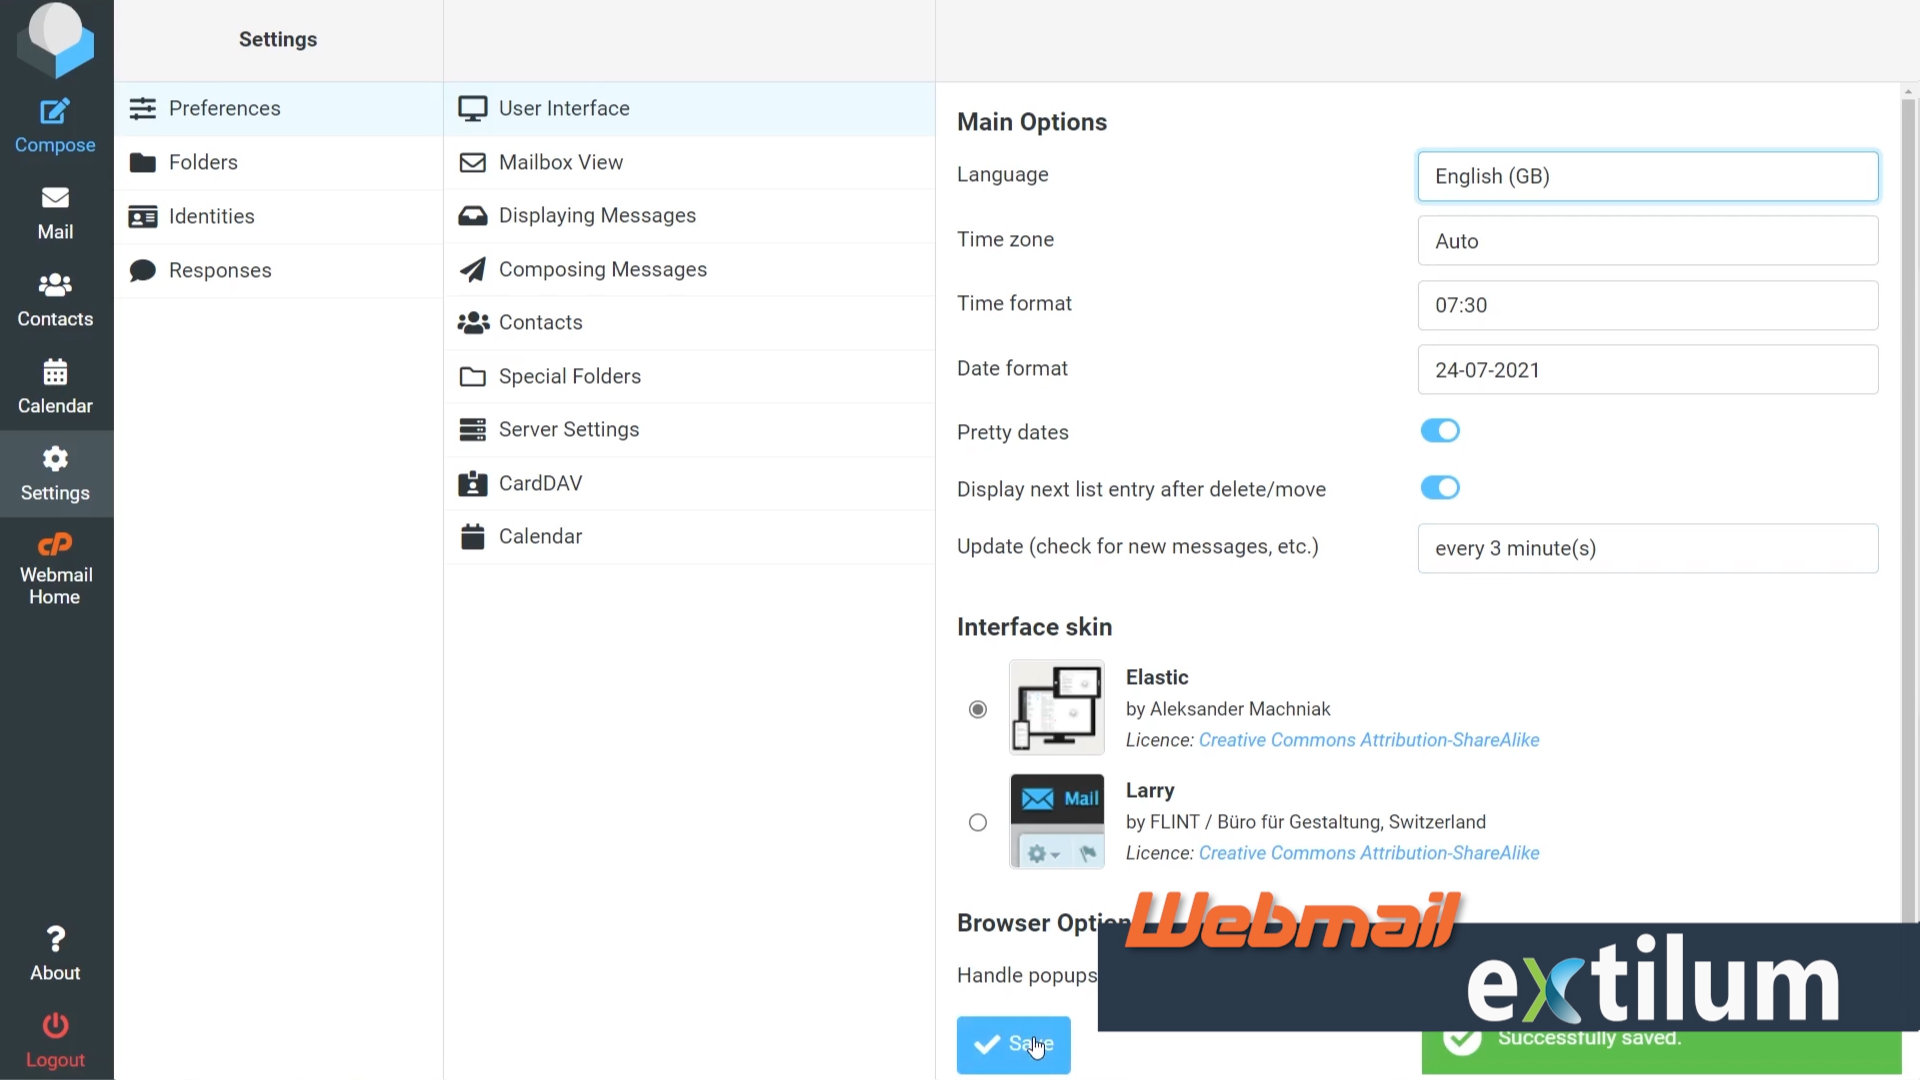
Step-by-step tutorial – Set Up Email Time Zone in Horde Webmail
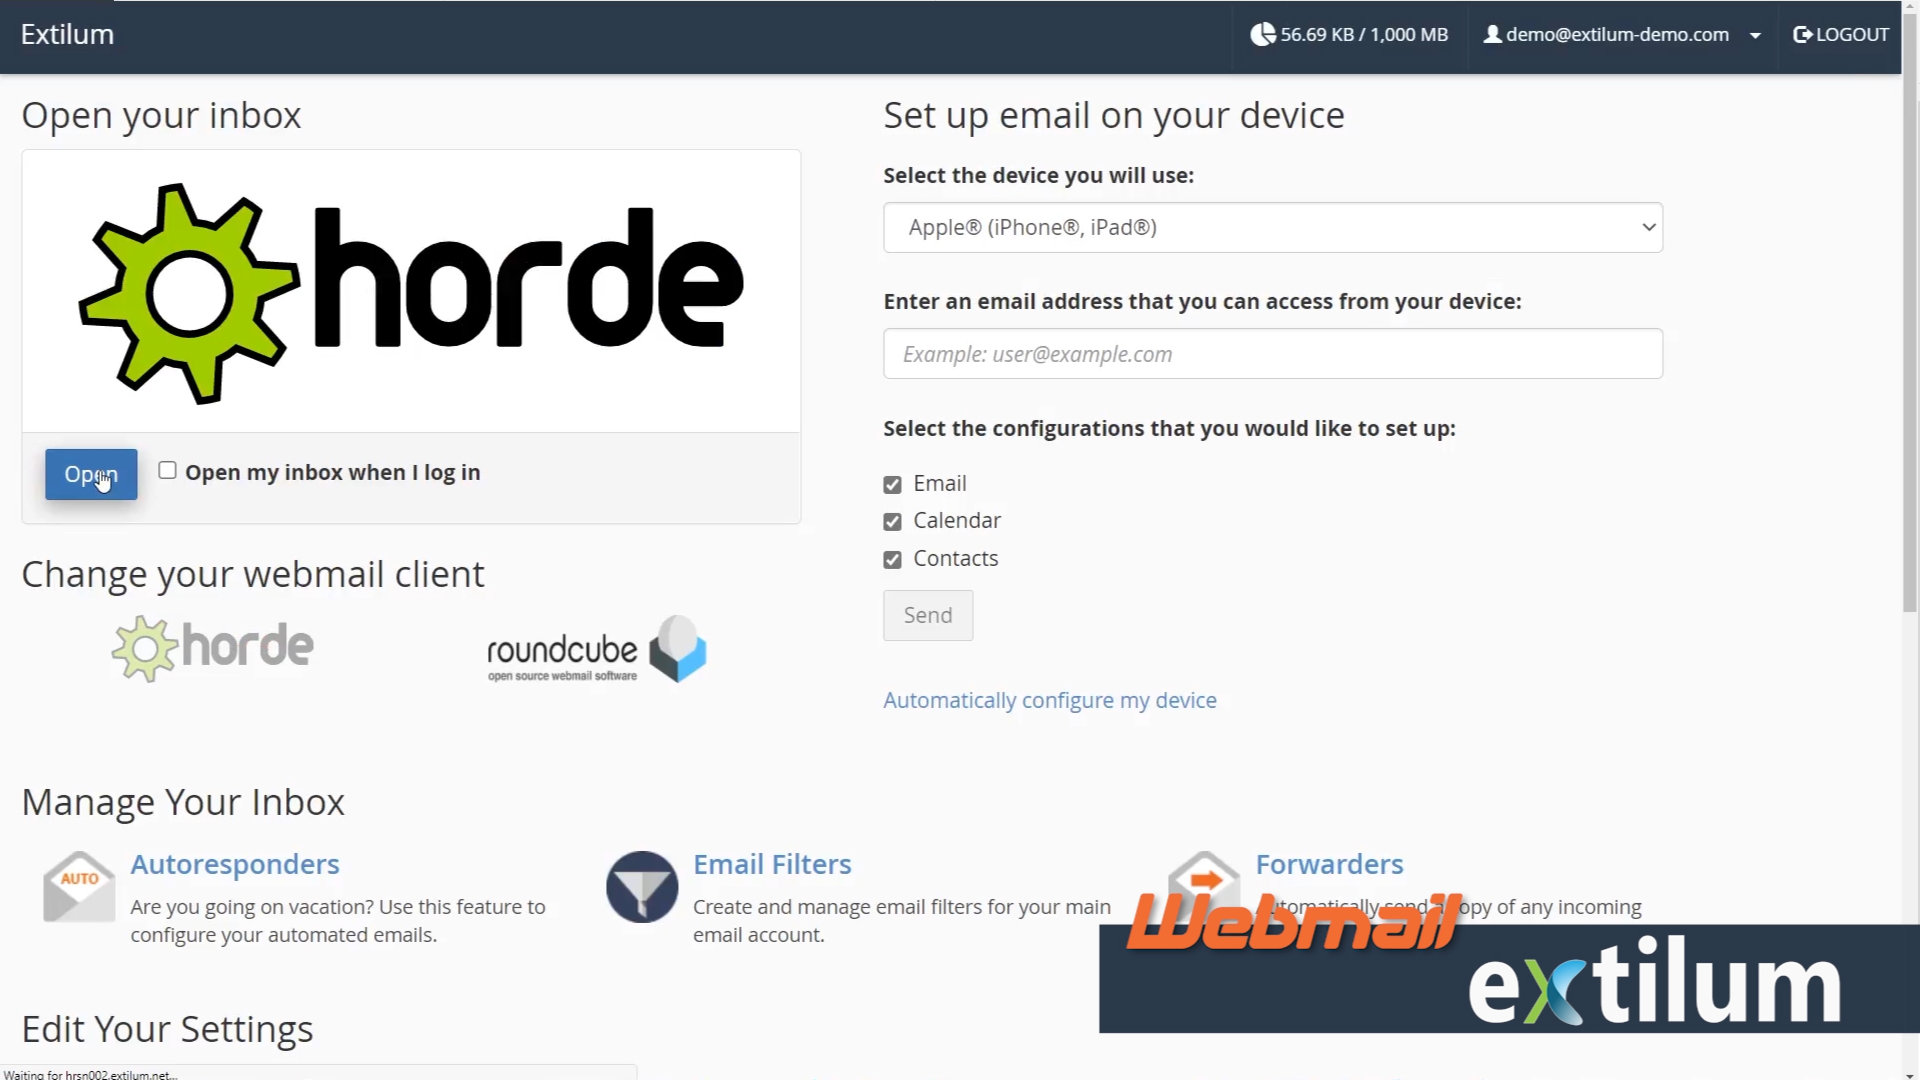
- Login to Webmail.
Under Change your webmail client click the Horde button.

2. Click the Open button under the Horde logo.
You can check the checkbox (next to the Open button) Open my inbox when I log in.
From then on, you will see the inbox of your default email account when logging into webmail.
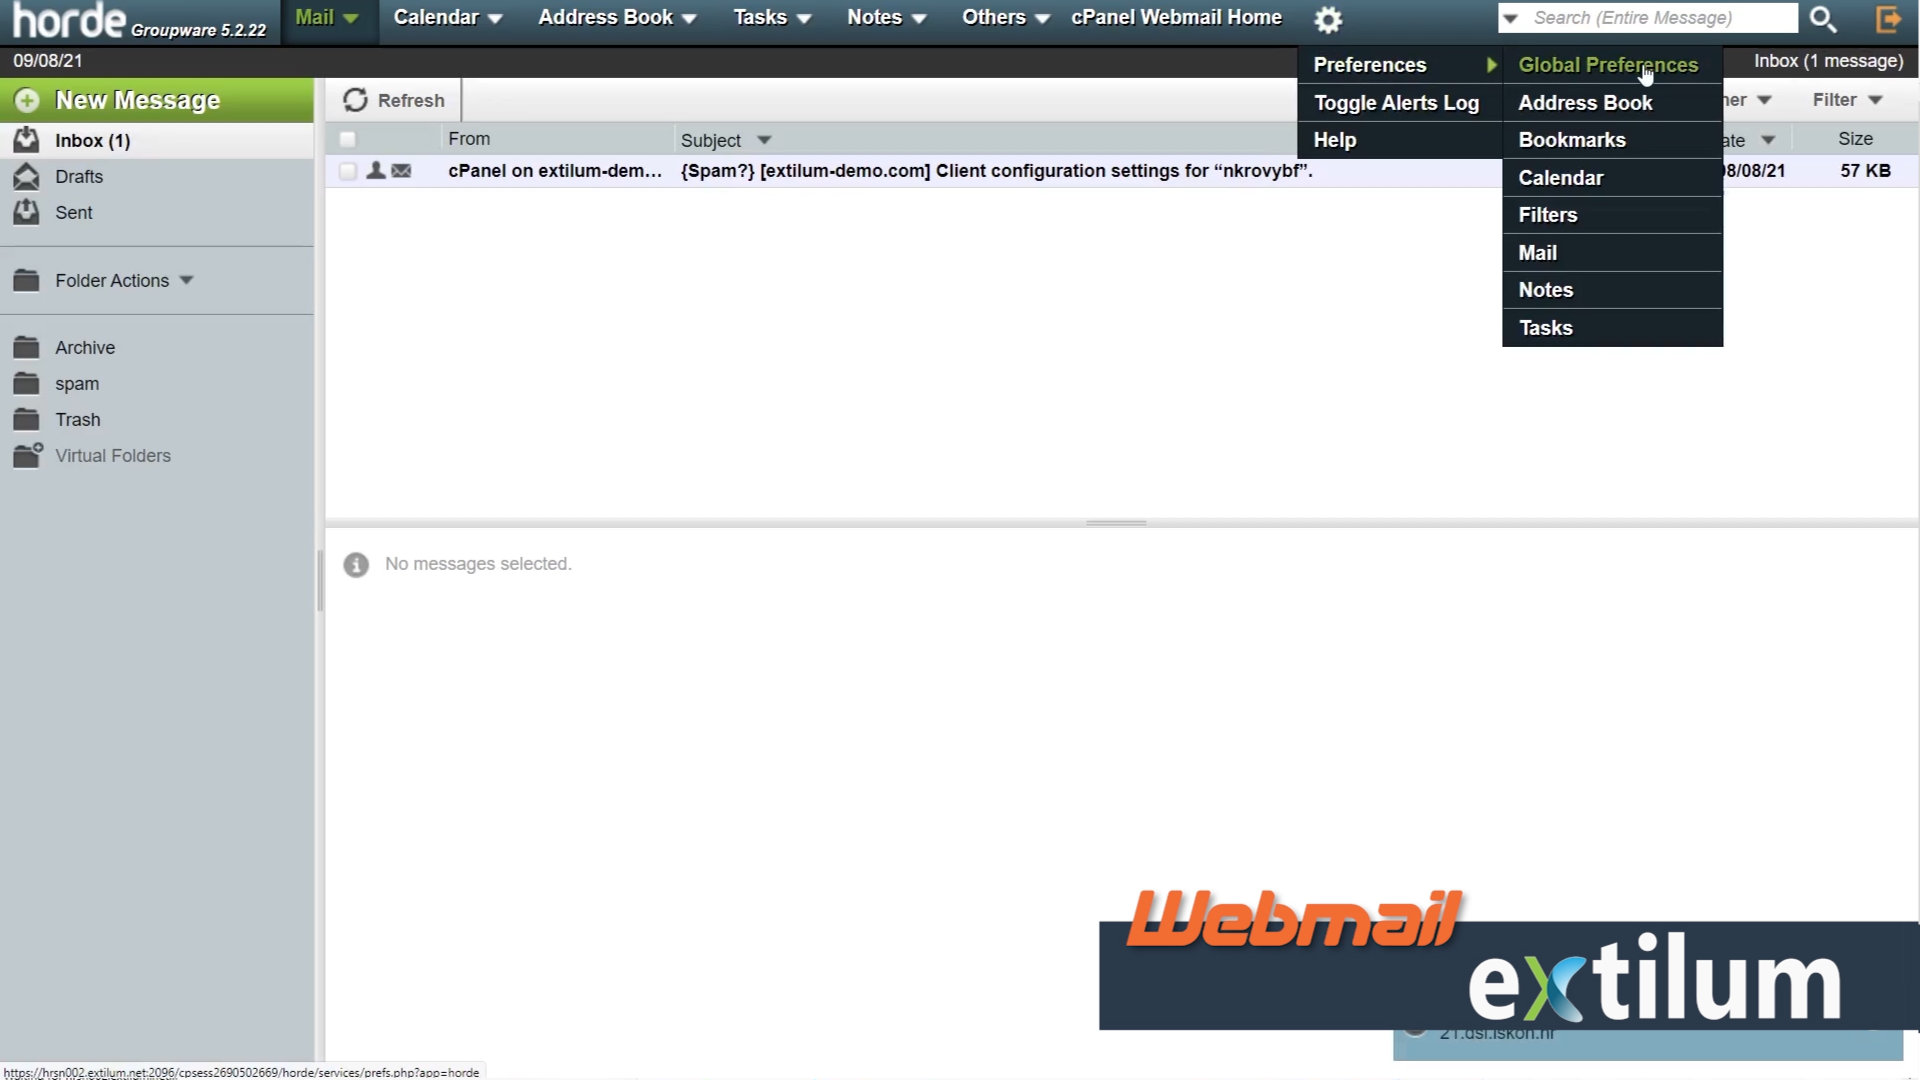
3. Click the Gear icon in the top horizontal taskbar.
In drop-down menu Select the Preferences.
In sub-menu Select the Global Preferences.
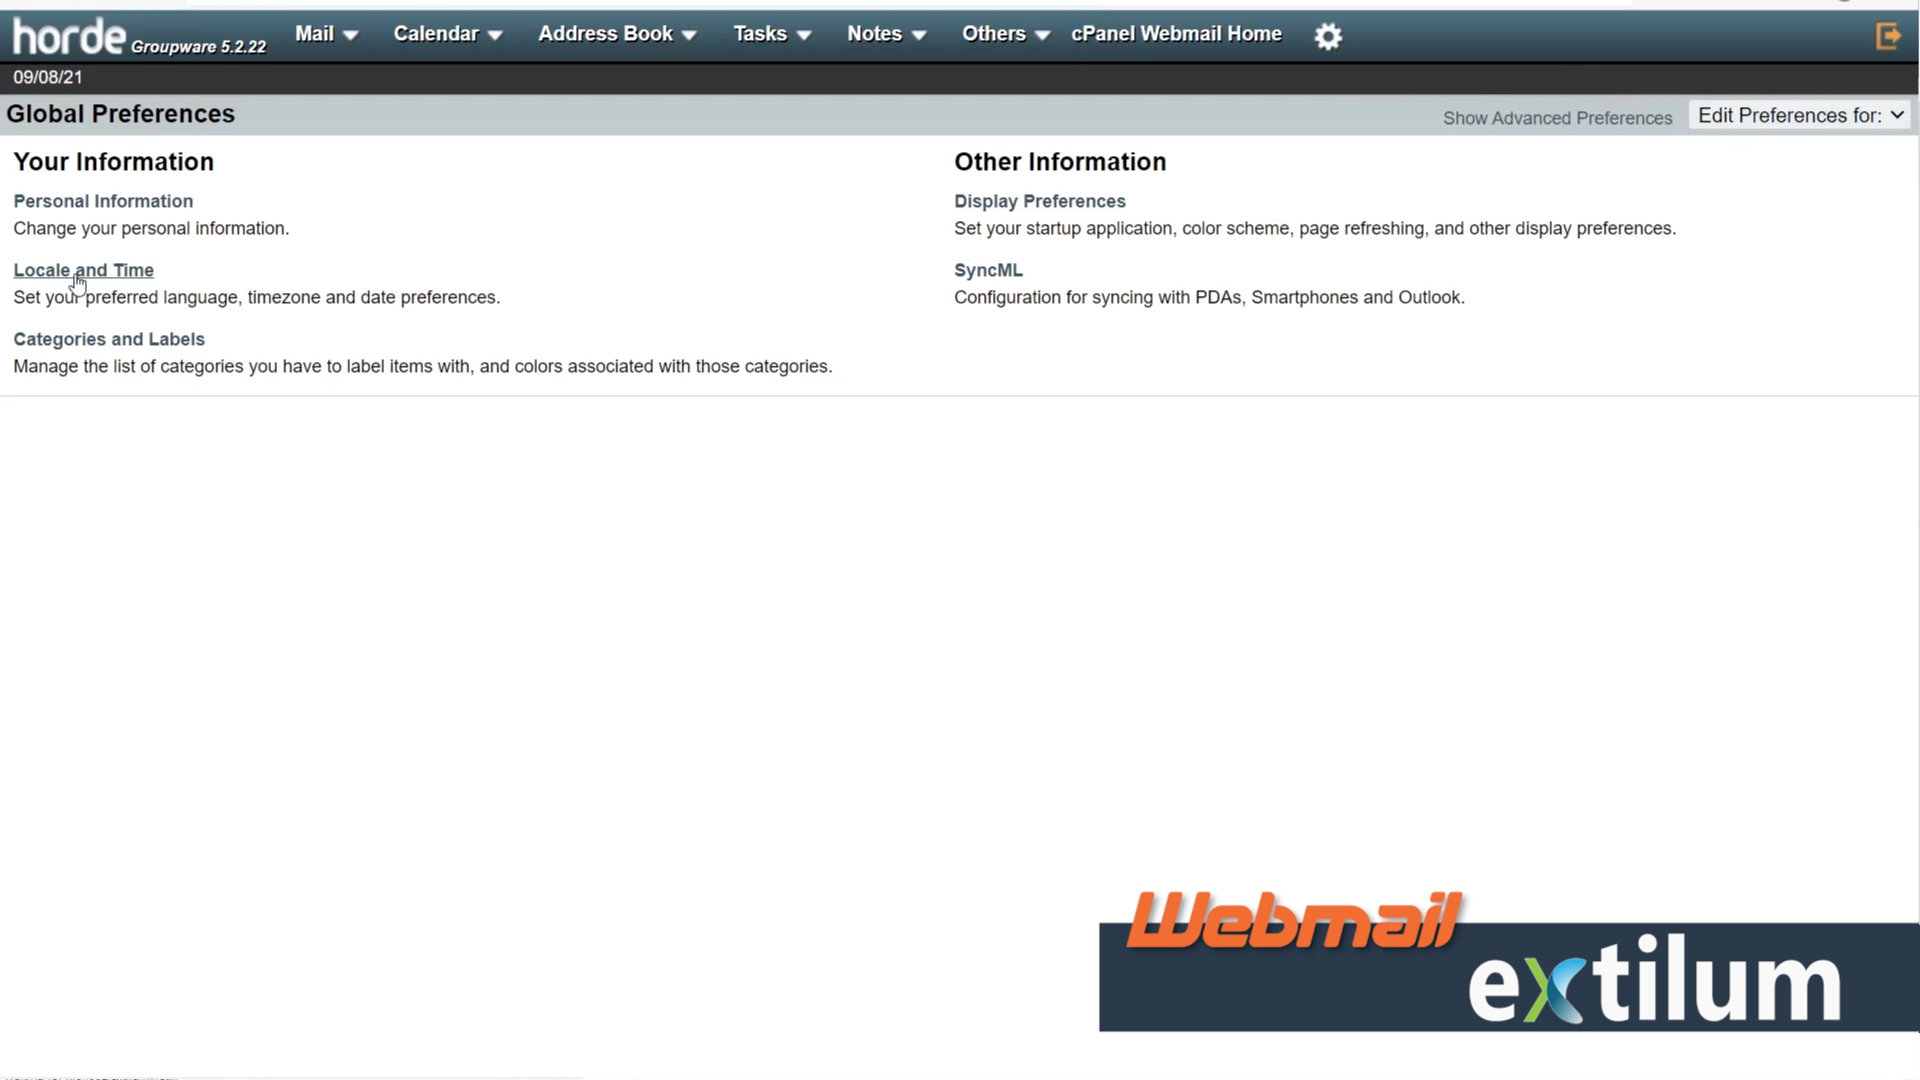
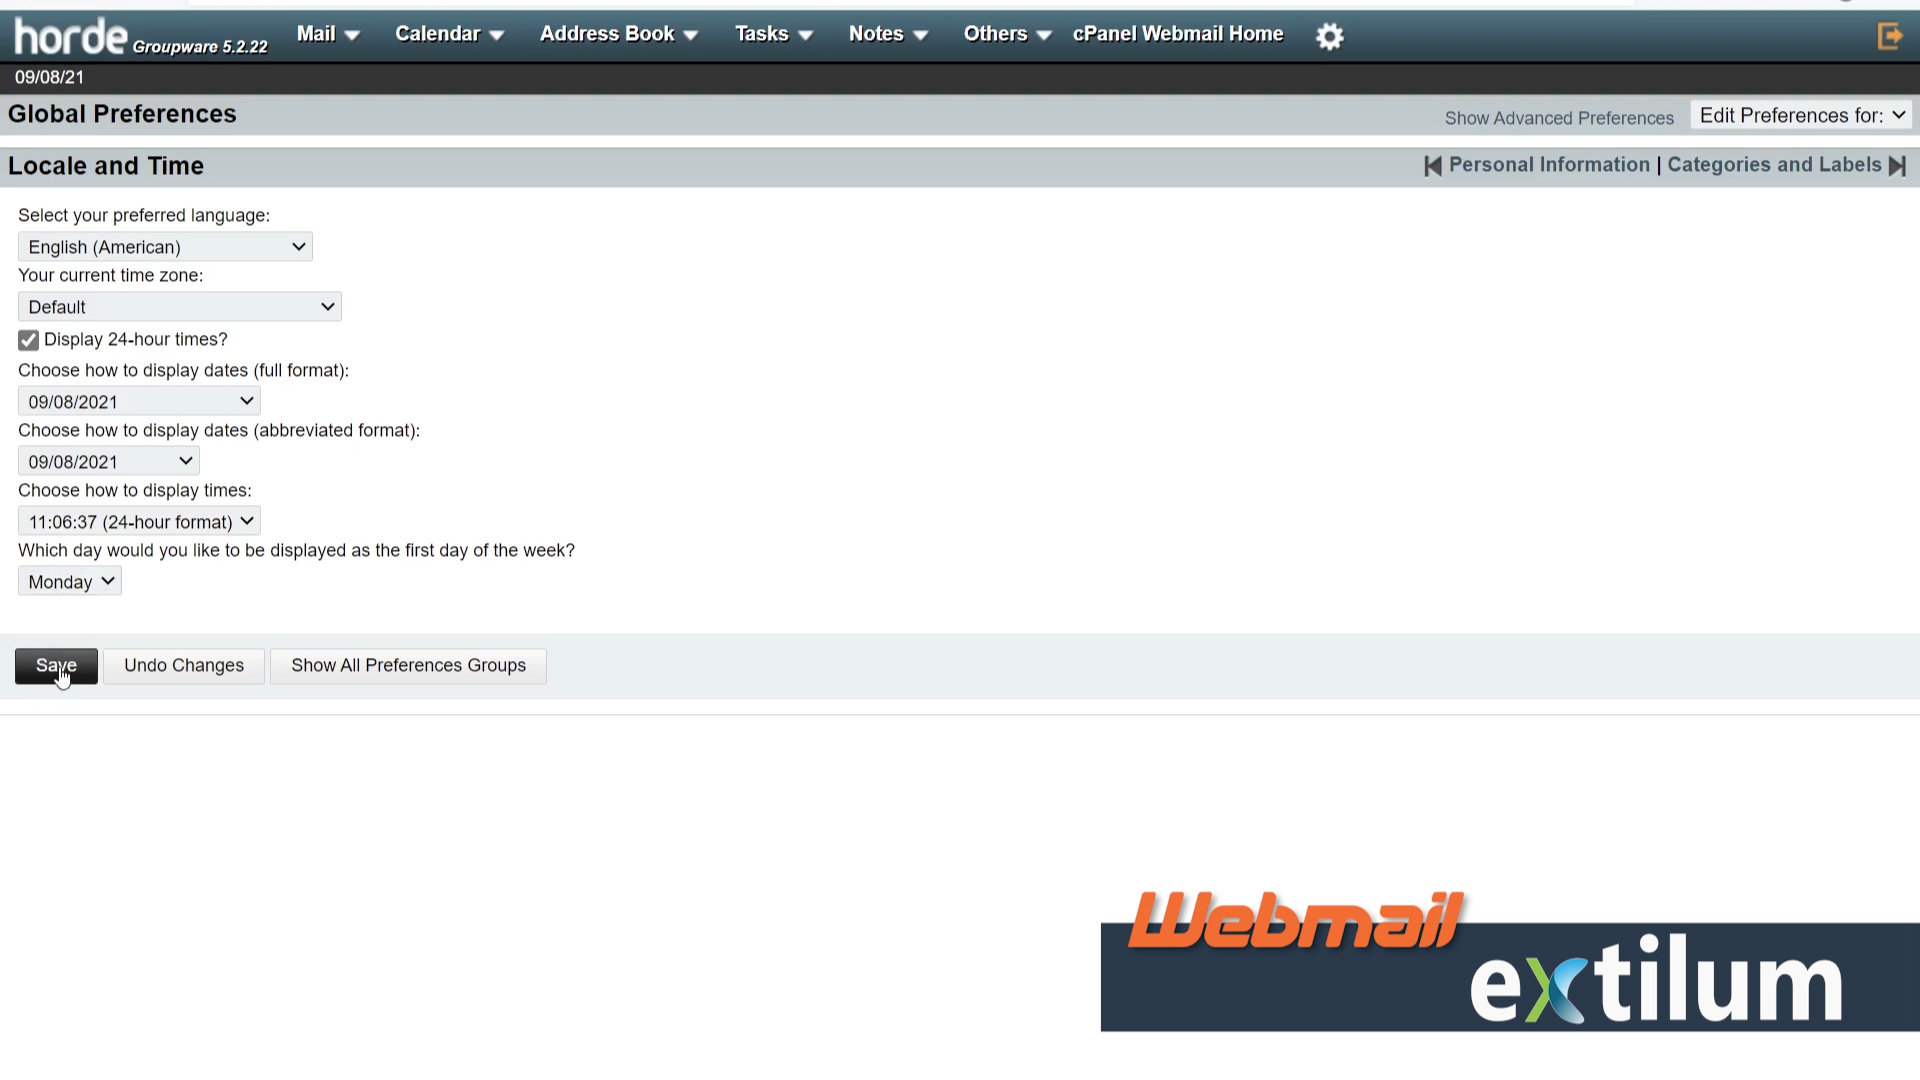
4. Under Your Information title, click the Locale and Time link.
5. Select your time zone under Your current time zone.
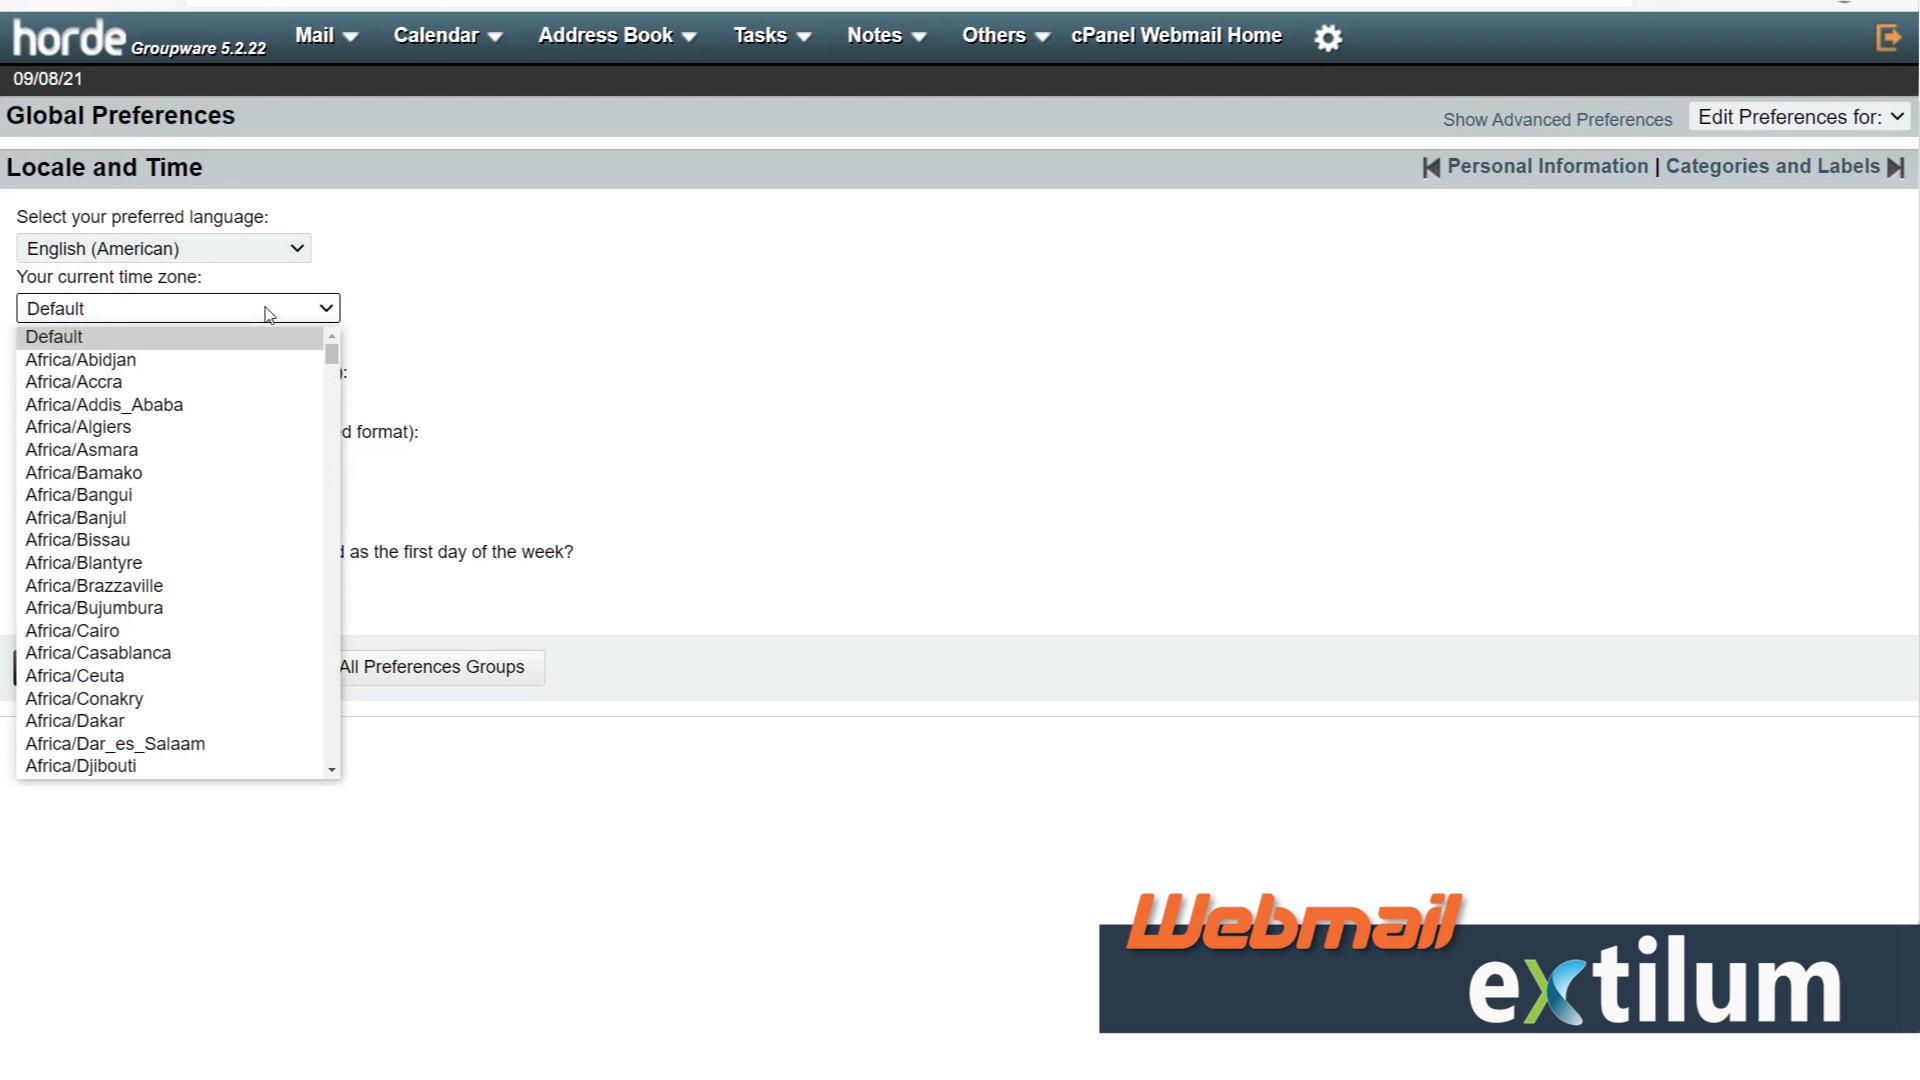
6. You can also set up Language, Time and date format, and more.
When finished click the Save button.
Related Articles
0 out of 5 stars
| 5 Stars | 0% | |
| 4 Stars | 0% | |
| 3 Stars | 0% | |
| 2 Stars | 0% | |
| 1 Stars | 0% |