Tip: Start typing in the input box for immediate search results.
-
Getting Started
-
Client area
-
- Search for a domain
- Domain Contact Information - Client Area
- Change Domain Nameservers - Client Area
- Domain Renewal - Client Area
- Domain Redirect - Client Area
- Domain Aliases - Client Area
- Manage Subdomains - Client Area
- Create an Addon domain - Client Area
- Domain Auto Renewal - Client Area
- Transfer a Domain to Extilum as Unregistered User
- Transfer a Domain to Extilum as Registered User — Client Area
- Manage a Domain - Client Area
- Domain Registrar Lock - Client Area
- Get Domain EPP Code - Client Area
- Transfer a Domain from Extilum
- DNS Management - Client Area
- Show all articles ( 1 ) Collapse Articles
-
-
- Manage Privileges for MySQL Database – Client Area
- Manage MySQL Database User - Client Area
- Manage MySQL Databases - Client Area
- Manage FTP Accounts - Client Area
- Create FTP Accounts - Client Area
- Domain Redirect - Client Area
- Domain Aliases - Client Area
- Manage DNS Records with Zone editor - Client Area
- Disk Usage - Client Area
- Manage Backups - Client Area
- File Manager - Client Area
- Use IP Blocker - Client Area
- Change PHP Version - Client Area
- Manage Subdomains - Client Area
- Unban IP Address - Client Area
- Create an Addon domain - Client Area
- Show all articles ( 1 ) Collapse Articles
-
cPanel
-
- Login to cPanel
- Login to cPanel from Extilum Client Area
- The Jupiter Theme Interface - cPanel
- Switch to Paper Lantern - cPanel
- Search - cPanel
- View Server Information for cPanel
- View Statistics - cPanel
- Change Style - cPanel
- Change Language -cPanel
- Change Password - cPanel
- Update Contact Information and Preferences - cPanel
- Add User - User Manager - cPanel
- Edit User in User Manager - cPanel
- Change Password - User Manager - cPanel
- Delete User in User Manager – cPanel
- Log out of cPanel
- Show all articles ( 1 ) Collapse Articles
-
-
-
- Accessing File Manager - cPanel
- File Manager Settings - cPanel
- Create a New File or Folder in File Manager - cPanel
- Rename a file or folder in File Manager - cPanel
- Change Permissions File Manager - cPanel
- Password Protect Directory File Manager - cPanel
- Enable Leech Protection File Manager - cPanel
- Manage indices File Manager - cPanel
- Upload and download files using File Manager - cPanel
- Compress Files using File Manager - cPanel
- Extract Files using File Manager – cPanel
- Delete and Restore in File Manager - cPanel
- Search in File Manager - cPanel
- Copy Files in File Manager - cPanel
- Move Files in File Manager - cPanel
- Edit a File Using File Manager - cPanel
- HTML Editor in File Manager - cPanel
- Show all articles ( 2 ) Collapse Articles
-
- Articles coming soon
-
-
-
-
- MySQL Databases Interface - cPanel
- Add New User to MySQL Databases - cPanel
- Change a MySQL Database User's Password - cPanel
- Rename a MySQL Database User - cPanel
- Create a MySQL Database - cPanel
- Add User to MySQL Database - cPanel
- Check and Repair MySQL Database - cPanel
- Revoke User Privileges from MySQL Database - cPanel
- Delete MySQL Database - cPanel
- Delete MySQL Database User - cPanel
- Manage MySQL Databases - cPanel
-
-
- Install WordPress using Softaculous - cPanel
- Automatically Update WordPress with Softaculous - cPanel
- Backup WordPress using Softaculous - cPanel
- Manage Backup Location Softaculous - cPanel
- Manage WordPress Automated Backups Softaculous - cPanel
- Restore WordPress Backup using Softaculous - cPanel
- Clone WordPress using Softaculous - cPanel
- Stage WordPress Website with Softaculous - cPanel
- Push WordPress From Staging to Live with Softaculous - cPanel
- Remove WordPress using Softaculous - cPanel
-
-
WordPress
-
- Install WordPress using Softaculous - cPanel
- Automatically Update WordPress with Softaculous - cPanel
- Backup WordPress using Softaculous - cPanel
- Manage Backup Location Softaculous - cPanel
- Manage WordPress Automated Backups Softaculous - cPanel
- Restore WordPress Backup using Softaculous - cPanel
- Clone WordPress using Softaculous - cPanel
- Stage WordPress Website with Softaculous - cPanel
- Push WordPress From Staging to Live with Softaculous - cPanel
- Remove WordPress using Softaculous - cPanel
-
- Install WordPress Using the WordPress Toolkit - cPanel
- WordPress Toolkit Updates and Security Status Check - Cpanel
- Manage Updates using WordPress Toolkit - cPanel
- Check WordPress Integrity with the WordPress Toolkit - cPanel
- Manage maintenance mode in the WordPress Toolkit - cPanel
- Stage WordPress with the WordPress Toolkit - cPanel
- Manage Plugins using the WordPress Toolkit - cPanel
- Manage Themes using the WordPress Toolkit - cPanel
- Manage WordPress multiple sites with WordPress Toolkit
- WordPress plugins for multiple sites - WordPress Toolkit
- WordPress Themes for multiple sites – WordPress Toolkit
- Delete or Detach WordPress site – WordPress Toolkit
- Add Existing WordPress Installations to WordPress Toolkit
- WordPress Toolkit Tools - cPanel
- Back up and Restore WordPress - WordPress Toolkit
-
-
Webmail
Create Your Email Account – cPanel
4.5 out of 5 stars
1 rating
| 5 Stars | 0% | |
| 4 Stars | 100% | |
| 3 Stars | 0% | |
| 2 Stars | 0% | |
| 1 Stars | 0% |
Learn how to Create an Email Account using cPanel. Choose desired username (which will also become your email address), password, auto generate password, storage space and more. All Extilum Web Hosting plans offer you unlimited Email Accounts.
Video tutorial – Create Email cPanel
Step-by-step tutorial – Create Email cPanel
Time needed: 2 minutes.
- Login to your cPanel
Tutorial: login from the Client Area or from the direct link.
cPanel Email section: Click on Email Accounts.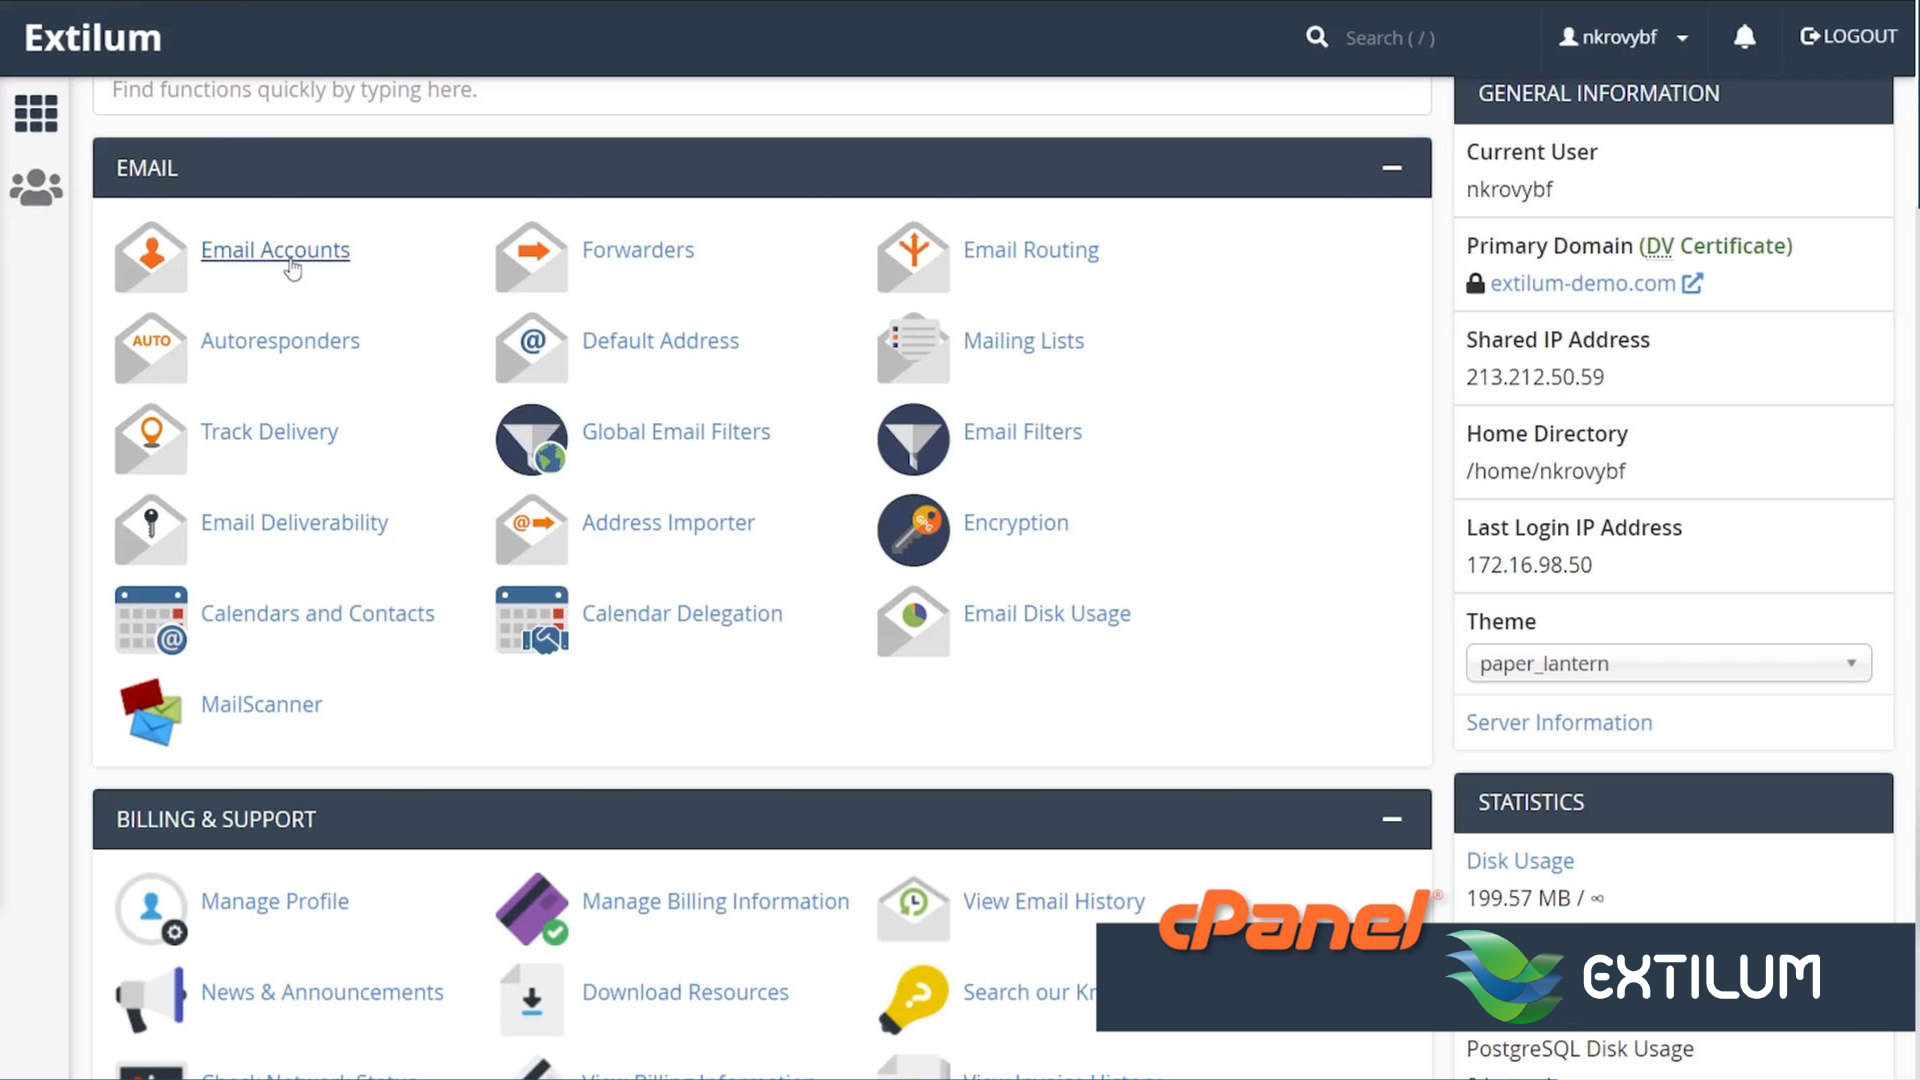
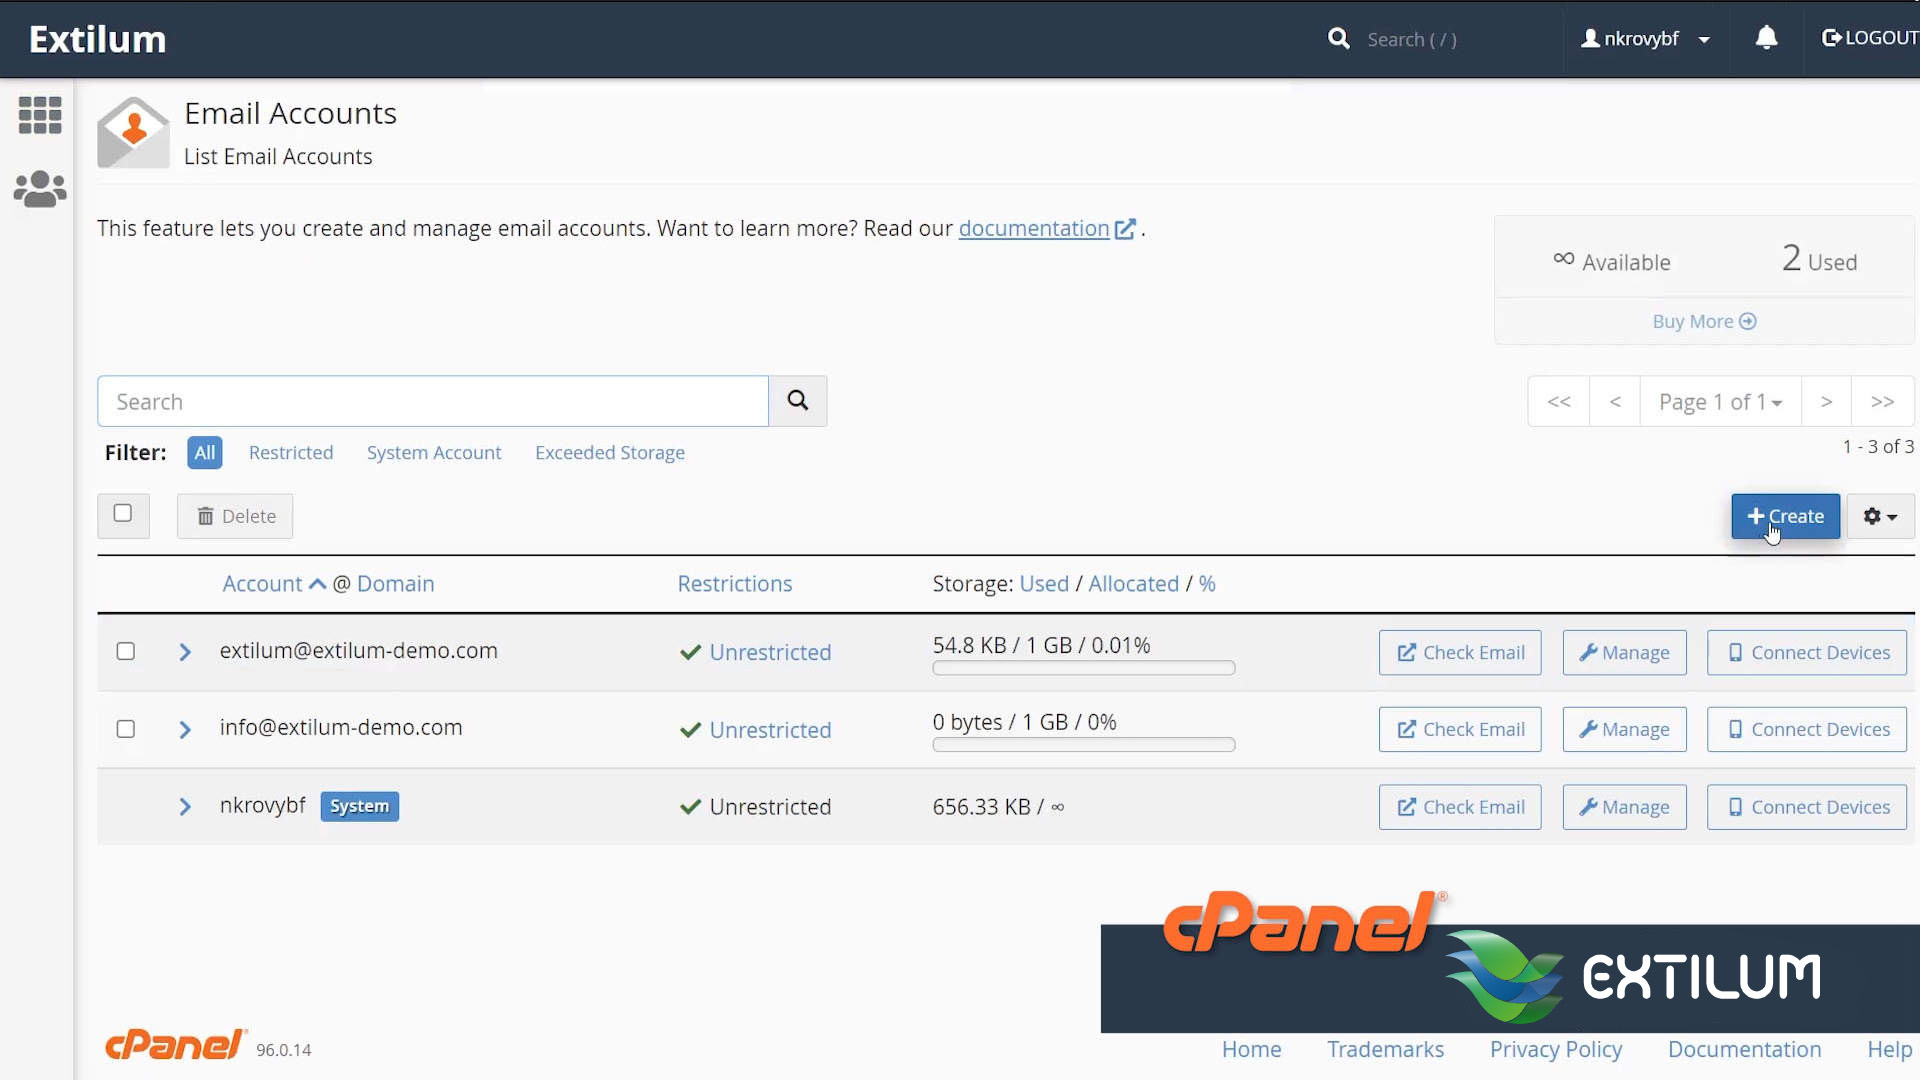
- Click on +Create button
To create a new Email Account, click on the button + Create.
- New window — Write Domain, Username and Password.
Domain
Select the domain where you wish to create a new email account.
Username
Write your Email Account Name. This will be before the @ symbol in the email address.
Password
— Select a set password now. Enter a secure password in the Password text box.
Password must have at least 8 characters, must contain at least three character categories among the following:
Uppercase characters (A-Z),
Lowercase characters (a-z),
Digits (0-9),
Special characters (~!@#$%^&*_-+=`|(){}[]:;”‘<>,.?/).
The system will evaluate the password that you enter on a scale of100. A weak password has 0 value, while a very secure password has 100 value. Or you can click Generate to let the system create a secure password for you.
— Select the Send login link to an alternate email address and enter an email address. The system will send a password creation link to this address.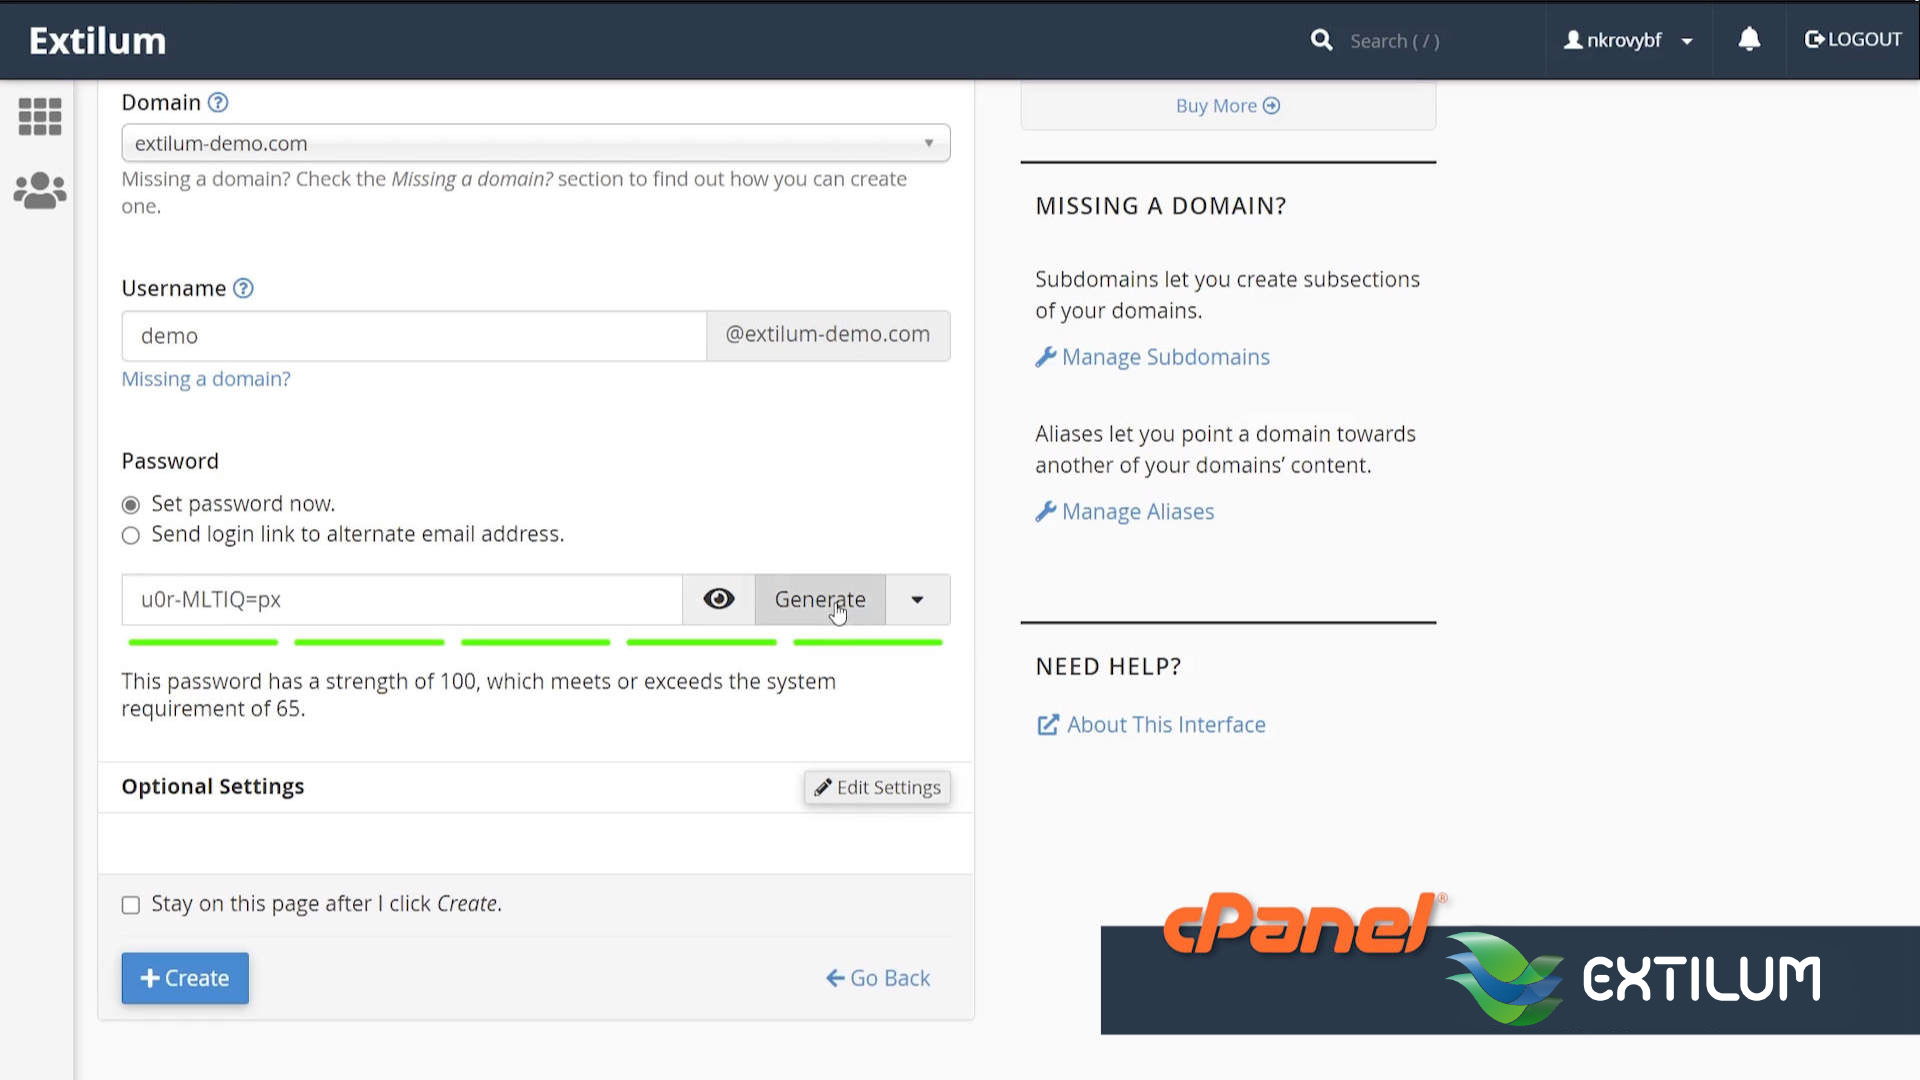
- Open optional Setting (optional)
Storage space
— Enter a custom disk storage size to limit the account’s email quota size, or
— Select Unlimited if you do not want to limit the account’s email quota size.
Automatically Create Folders for Plus Addressing
— Automatically Create Folders — When you receive an email that uses plus addressing, the system will create a new folder. The server moves a message that uses plus addressing to a designated folder if the folder exists. For example, the system would place a message touser+plusaddress@example.comin the plus address folder.
— Do Not Automatically Create Folders. — When you receive an email that uses plus addressing, the system will not create a new folder. Instead, it delivers the message to theINBOXfolder.
Send welcome email with instructions to set up a mail client
Select the Send welcome email with instructions to set up a mail client checkbox to send the user mail client set up instructions. The user can access this message via Webmail. This message contains the mail client details and the.mobileconfigfile for Apple® devices.
Stay on this page after I click Create
Select the Stay on this page after I click Create checkbox to create another email account after you create this one.
Click +Create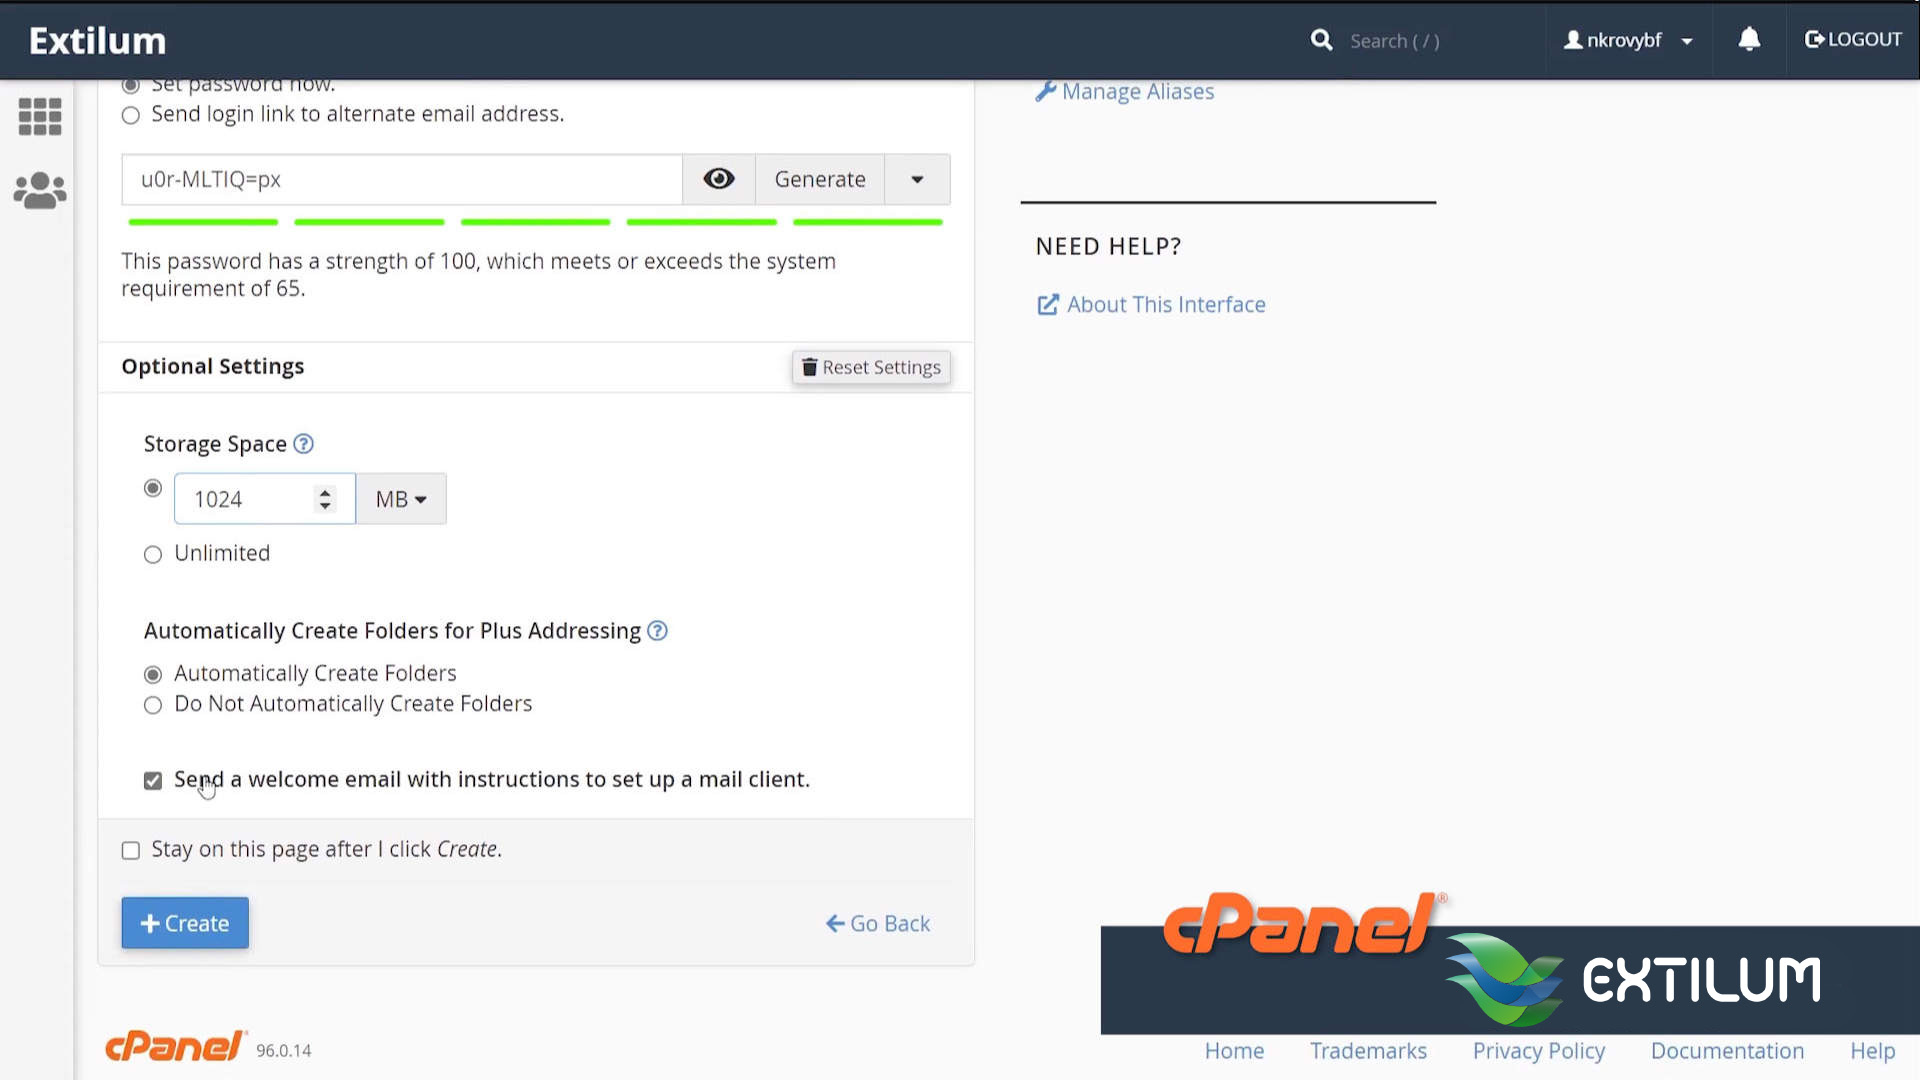
- Return to the Email Accounts interface
Return to the Email Account, and find your new Email Account.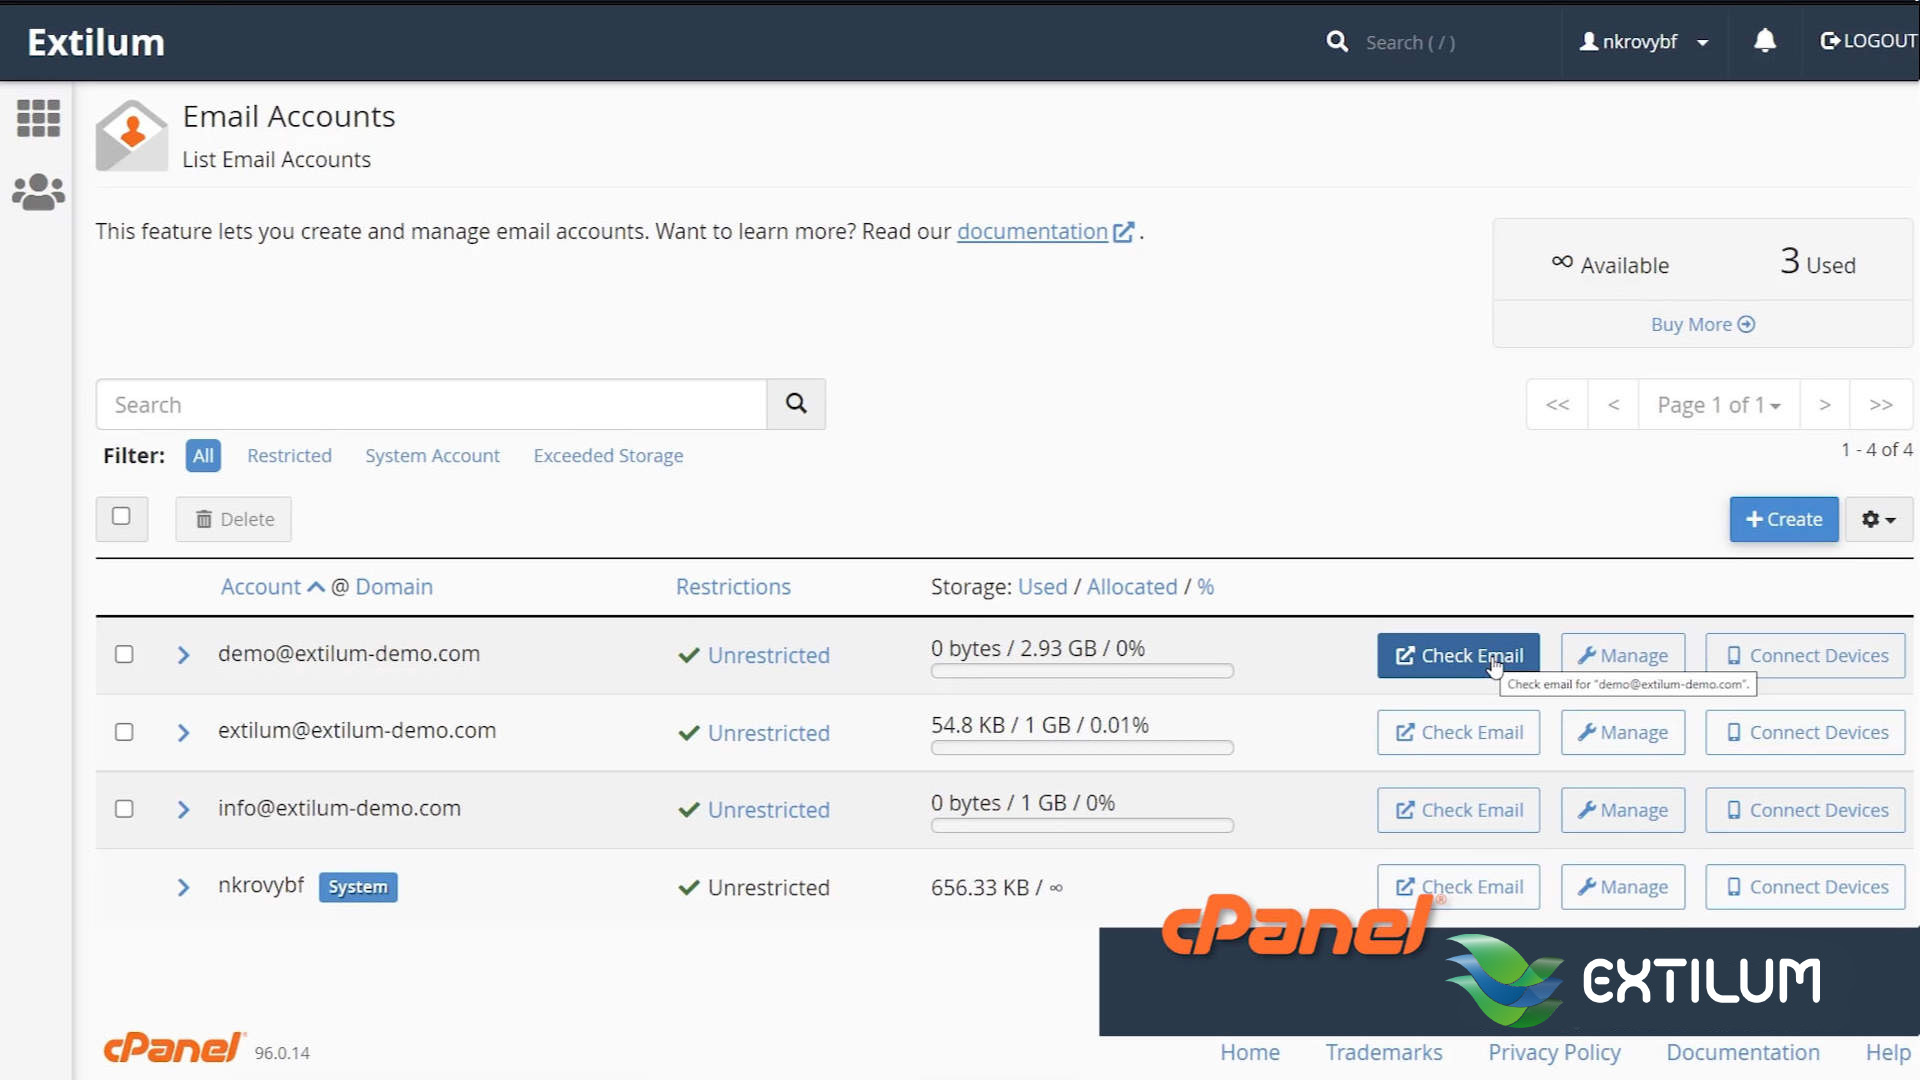
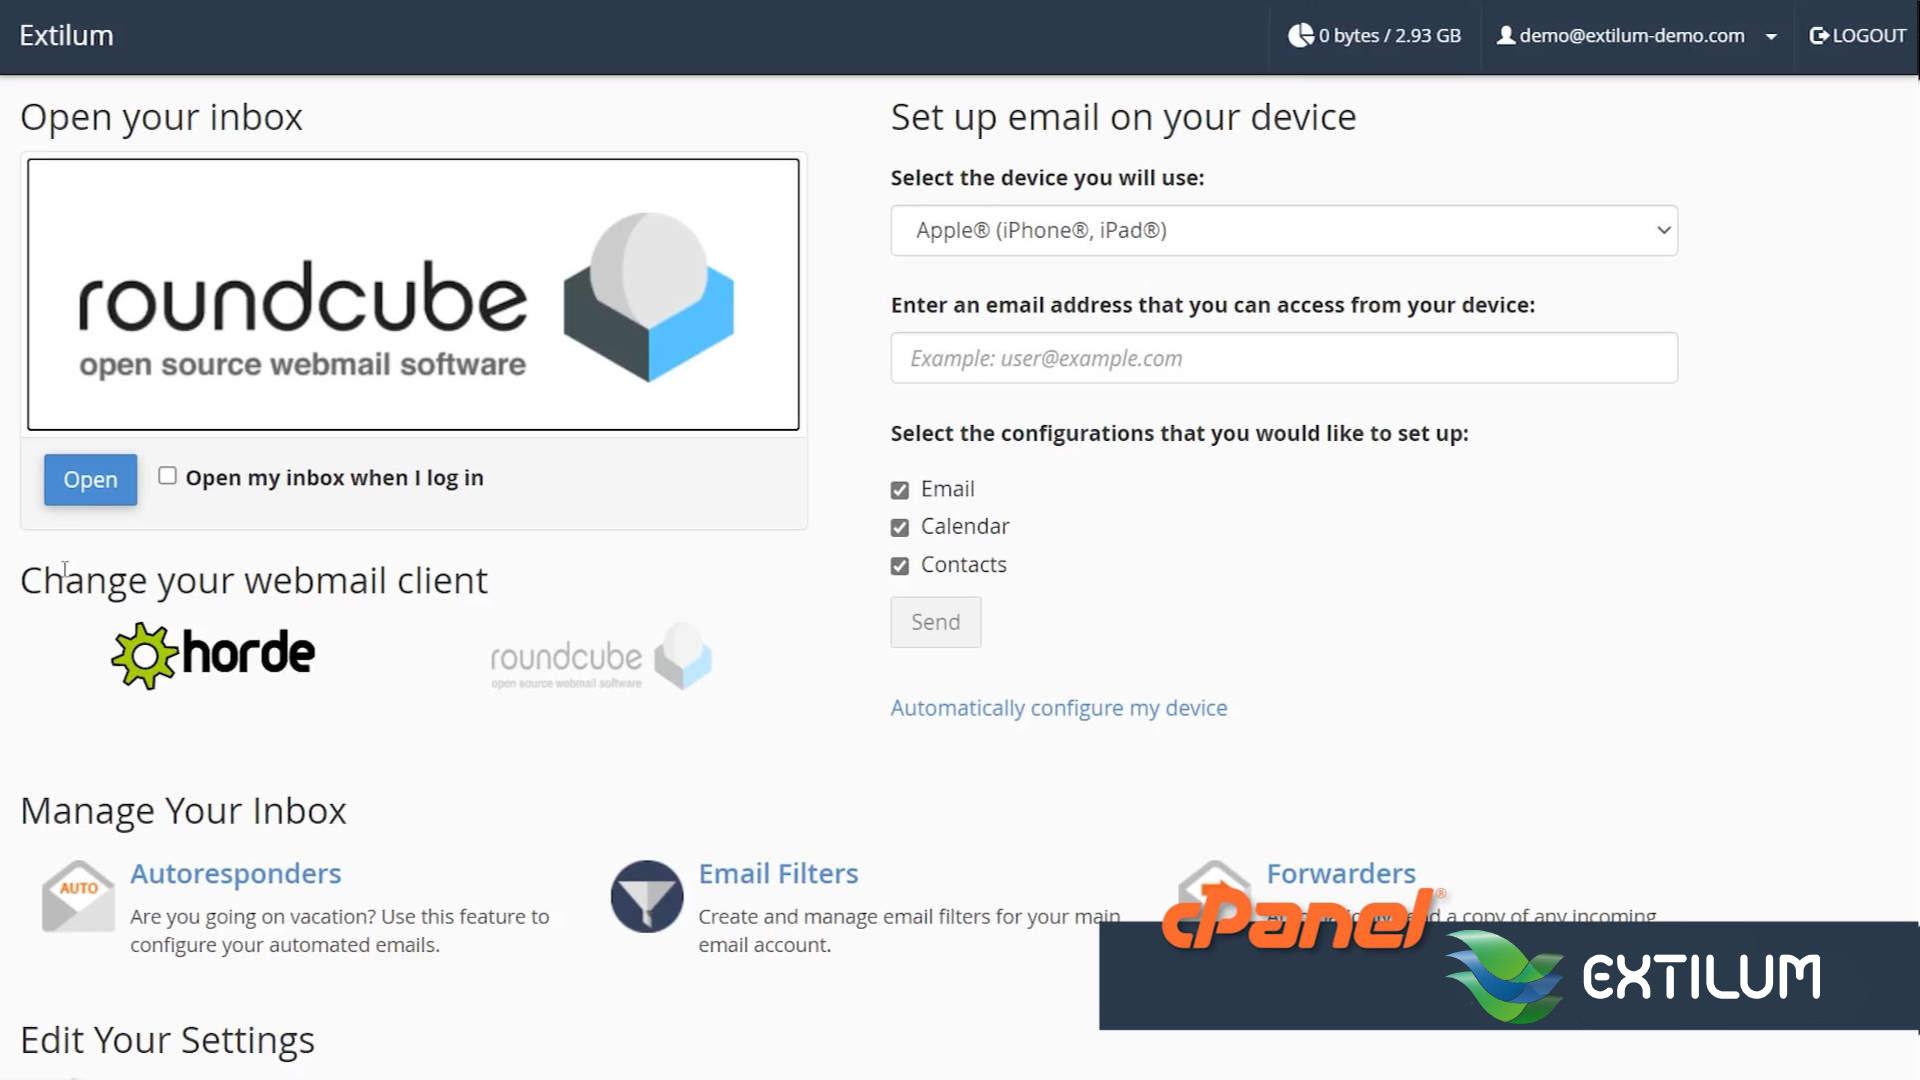
- Open Webmail – Click on Check Email button. System opens Webmail app.
Related Articles
4.5 out of 5 stars
1 rating
| 5 Stars | 0% | |
| 4 Stars | 100% | |
| 3 Stars | 0% | |
| 2 Stars | 0% | |
| 1 Stars | 0% |
