Tip: Start typing in the input box for immediate search results.
-
Getting Started
-
Client area
-
- Search for a domain
- Domain Contact Information - Client Area
- Change Domain Nameservers - Client Area
- Domain Renewal - Client Area
- Domain Redirect - Client Area
- Domain Aliases - Client Area
- Manage Subdomains - Client Area
- Create an Addon domain - Client Area
- Domain Auto Renewal - Client Area
- Transfer a Domain to Extilum as Unregistered User
- Transfer a Domain to Extilum as Registered User — Client Area
- Manage a Domain - Client Area
- Domain Registrar Lock - Client Area
- Get Domain EPP Code - Client Area
- Transfer a Domain from Extilum
- DNS Management - Client Area
- Show all articles ( 1 ) Collapse Articles
-
-
- Manage Privileges for MySQL Database – Client Area
- Manage MySQL Database User - Client Area
- Manage MySQL Databases - Client Area
- Manage FTP Accounts - Client Area
- Create FTP Accounts - Client Area
- Domain Redirect - Client Area
- Domain Aliases - Client Area
- Manage DNS Records with Zone editor - Client Area
- Disk Usage - Client Area
- Manage Backups - Client Area
- File Manager - Client Area
- Use IP Blocker - Client Area
- Change PHP Version - Client Area
- Manage Subdomains - Client Area
- Unban IP Address - Client Area
- Create an Addon domain - Client Area
- Show all articles ( 1 ) Collapse Articles
-
cPanel
-
- Login to cPanel
- Login to cPanel from Extilum Client Area
- The Jupiter Theme Interface - cPanel
- Switch to Paper Lantern - cPanel
- Search - cPanel
- View Server Information for cPanel
- View Statistics - cPanel
- Change Style - cPanel
- Change Language -cPanel
- Change Password - cPanel
- Update Contact Information and Preferences - cPanel
- Add User - User Manager - cPanel
- Edit User in User Manager - cPanel
- Change Password - User Manager - cPanel
- Delete User in User Manager – cPanel
- Log out of cPanel
- Show all articles ( 1 ) Collapse Articles
-
-
-
- Accessing File Manager - cPanel
- File Manager Settings - cPanel
- Create a New File or Folder in File Manager - cPanel
- Rename a file or folder in File Manager - cPanel
- Change Permissions File Manager - cPanel
- Password Protect Directory File Manager - cPanel
- Enable Leech Protection File Manager - cPanel
- Manage indices File Manager - cPanel
- Upload and download files using File Manager - cPanel
- Compress Files using File Manager - cPanel
- Extract Files using File Manager – cPanel
- Delete and Restore in File Manager - cPanel
- Search in File Manager - cPanel
- Copy Files in File Manager - cPanel
- Move Files in File Manager - cPanel
- Edit a File Using File Manager - cPanel
- HTML Editor in File Manager - cPanel
- Show all articles ( 2 ) Collapse Articles
-
- Articles coming soon
-
-
-
-
- MySQL Databases Interface - cPanel
- Add New User to MySQL Databases - cPanel
- Change a MySQL Database User's Password - cPanel
- Rename a MySQL Database User - cPanel
- Create a MySQL Database - cPanel
- Add User to MySQL Database - cPanel
- Check and Repair MySQL Database - cPanel
- Revoke User Privileges from MySQL Database - cPanel
- Delete MySQL Database - cPanel
- Delete MySQL Database User - cPanel
- Manage MySQL Databases - cPanel
-
-
- Install WordPress using Softaculous - cPanel
- Automatically Update WordPress with Softaculous - cPanel
- Backup WordPress using Softaculous - cPanel
- Manage Backup Location Softaculous - cPanel
- Manage WordPress Automated Backups Softaculous - cPanel
- Restore WordPress Backup using Softaculous - cPanel
- Clone WordPress using Softaculous - cPanel
- Stage WordPress Website with Softaculous - cPanel
- Push WordPress From Staging to Live with Softaculous - cPanel
- Remove WordPress using Softaculous - cPanel
-
-
WordPress
-
- Install WordPress using Softaculous - cPanel
- Automatically Update WordPress with Softaculous - cPanel
- Backup WordPress using Softaculous - cPanel
- Manage Backup Location Softaculous - cPanel
- Manage WordPress Automated Backups Softaculous - cPanel
- Restore WordPress Backup using Softaculous - cPanel
- Clone WordPress using Softaculous - cPanel
- Stage WordPress Website with Softaculous - cPanel
- Push WordPress From Staging to Live with Softaculous - cPanel
- Remove WordPress using Softaculous - cPanel
-
- Install WordPress Using the WordPress Toolkit - cPanel
- WordPress Toolkit Updates and Security Status Check - Cpanel
- Manage Updates using WordPress Toolkit - cPanel
- Check WordPress Integrity with the WordPress Toolkit - cPanel
- Manage maintenance mode in the WordPress Toolkit - cPanel
- Stage WordPress with the WordPress Toolkit - cPanel
- Manage Plugins using the WordPress Toolkit - cPanel
- Manage Themes using the WordPress Toolkit - cPanel
- Manage WordPress multiple sites with WordPress Toolkit
- WordPress plugins for multiple sites - WordPress Toolkit
- WordPress Themes for multiple sites – WordPress Toolkit
- Delete or Detach WordPress site – WordPress Toolkit
- Add Existing WordPress Installations to WordPress Toolkit
- WordPress Toolkit Tools - cPanel
- Back up and Restore WordPress - WordPress Toolkit
-
-
Webmail
Register a New Domain as Unregistered User – Client Area
0 out of 5 stars
| 5 Stars | 0% | |
| 4 Stars | 0% | |
| 3 Stars | 0% | |
| 2 Stars | 0% | |
| 1 Stars | 0% |
Learn How to Register a New Domain as an Unregistered User in the Client Area. Registering a domain is a simple process, with only a few steps. This tutorial will assume that you are an Unregistered User and don’t already have an account with Extilum.
Video tutorial – Register a New Domain as Unregistered User
Step-by-step tutorial – Register a New Domain as Unregistered User
- Extilum Client Area
Go to Extilum Client Area Page.
Select the Store button in the menu on the left. It opens up a submenu.
Click the Register a New Domain link.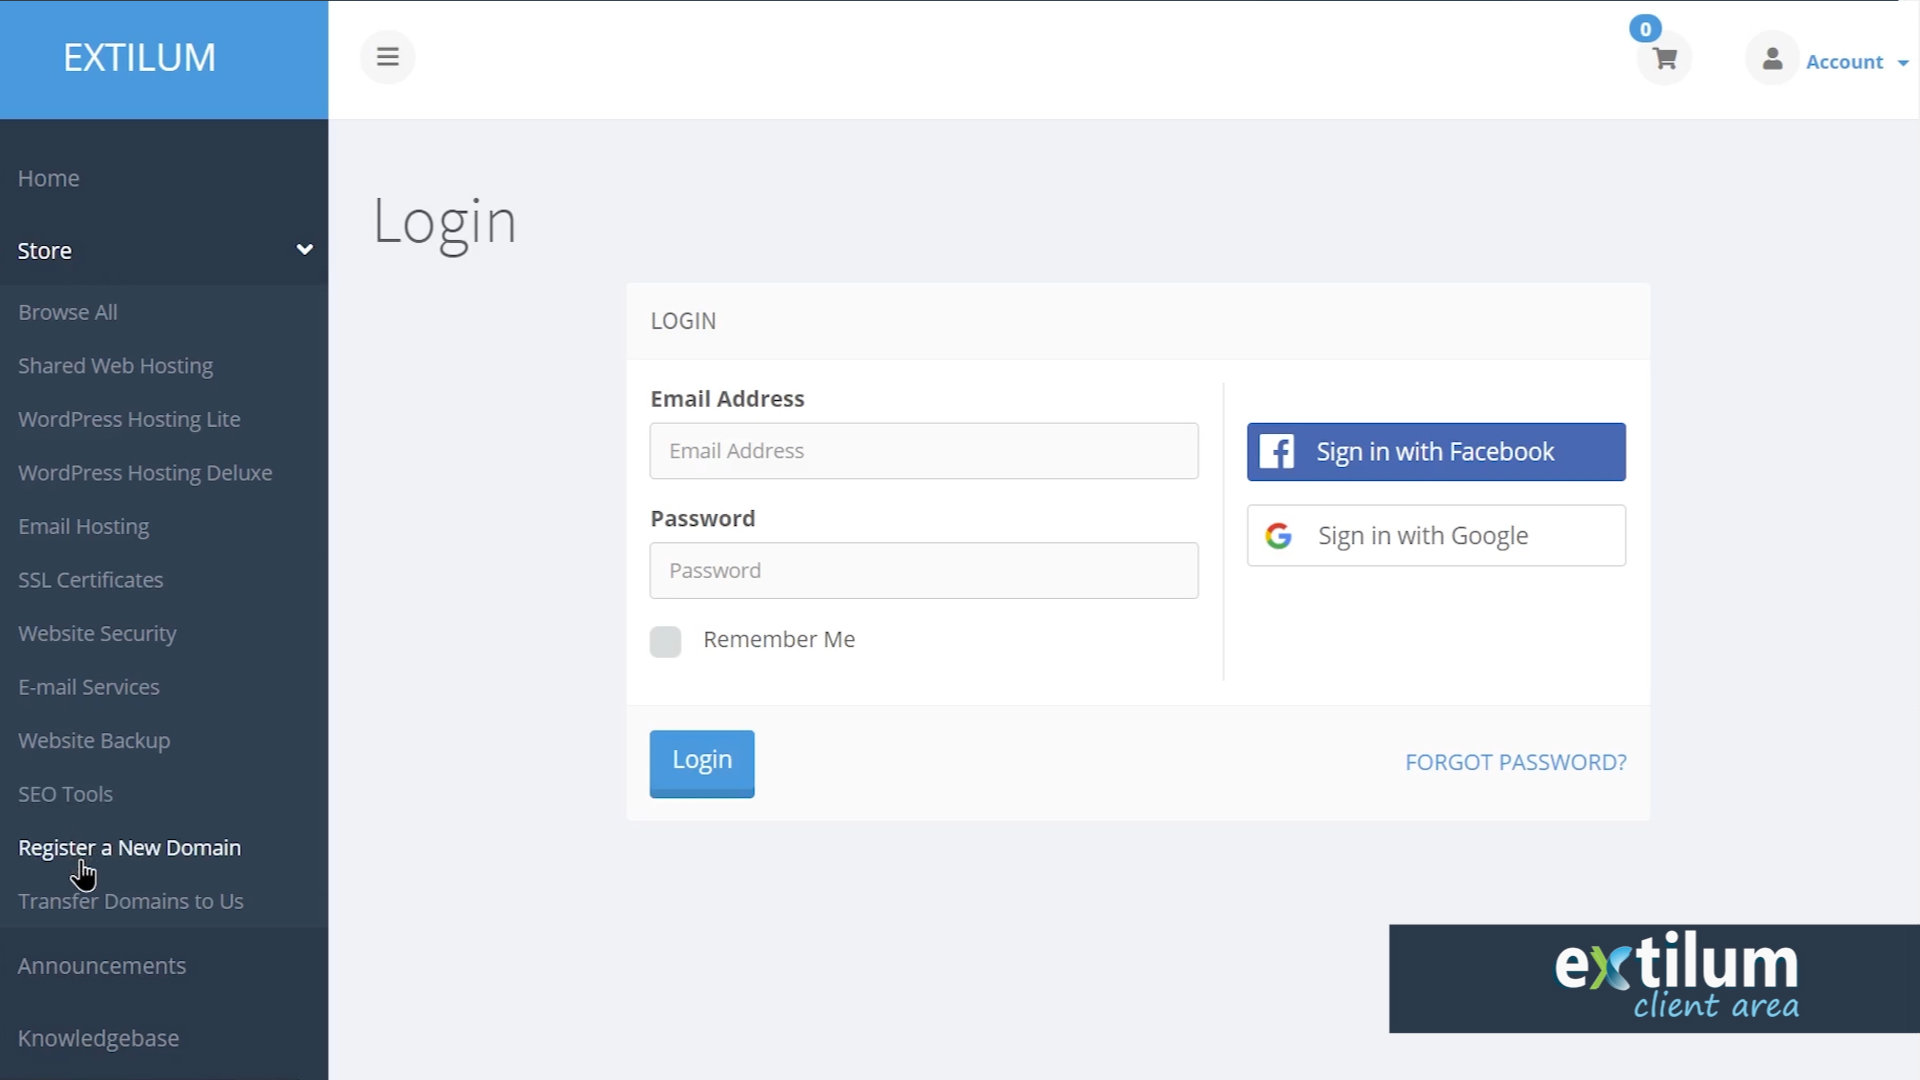
- Register Domain
In the search bar, type the domain name you would like to register.
If the name is available, you will get a success message.
Sometimes, more than one (TLD) is available, and you may have a choice.
Choose the one you want, and click the Add To Cart button.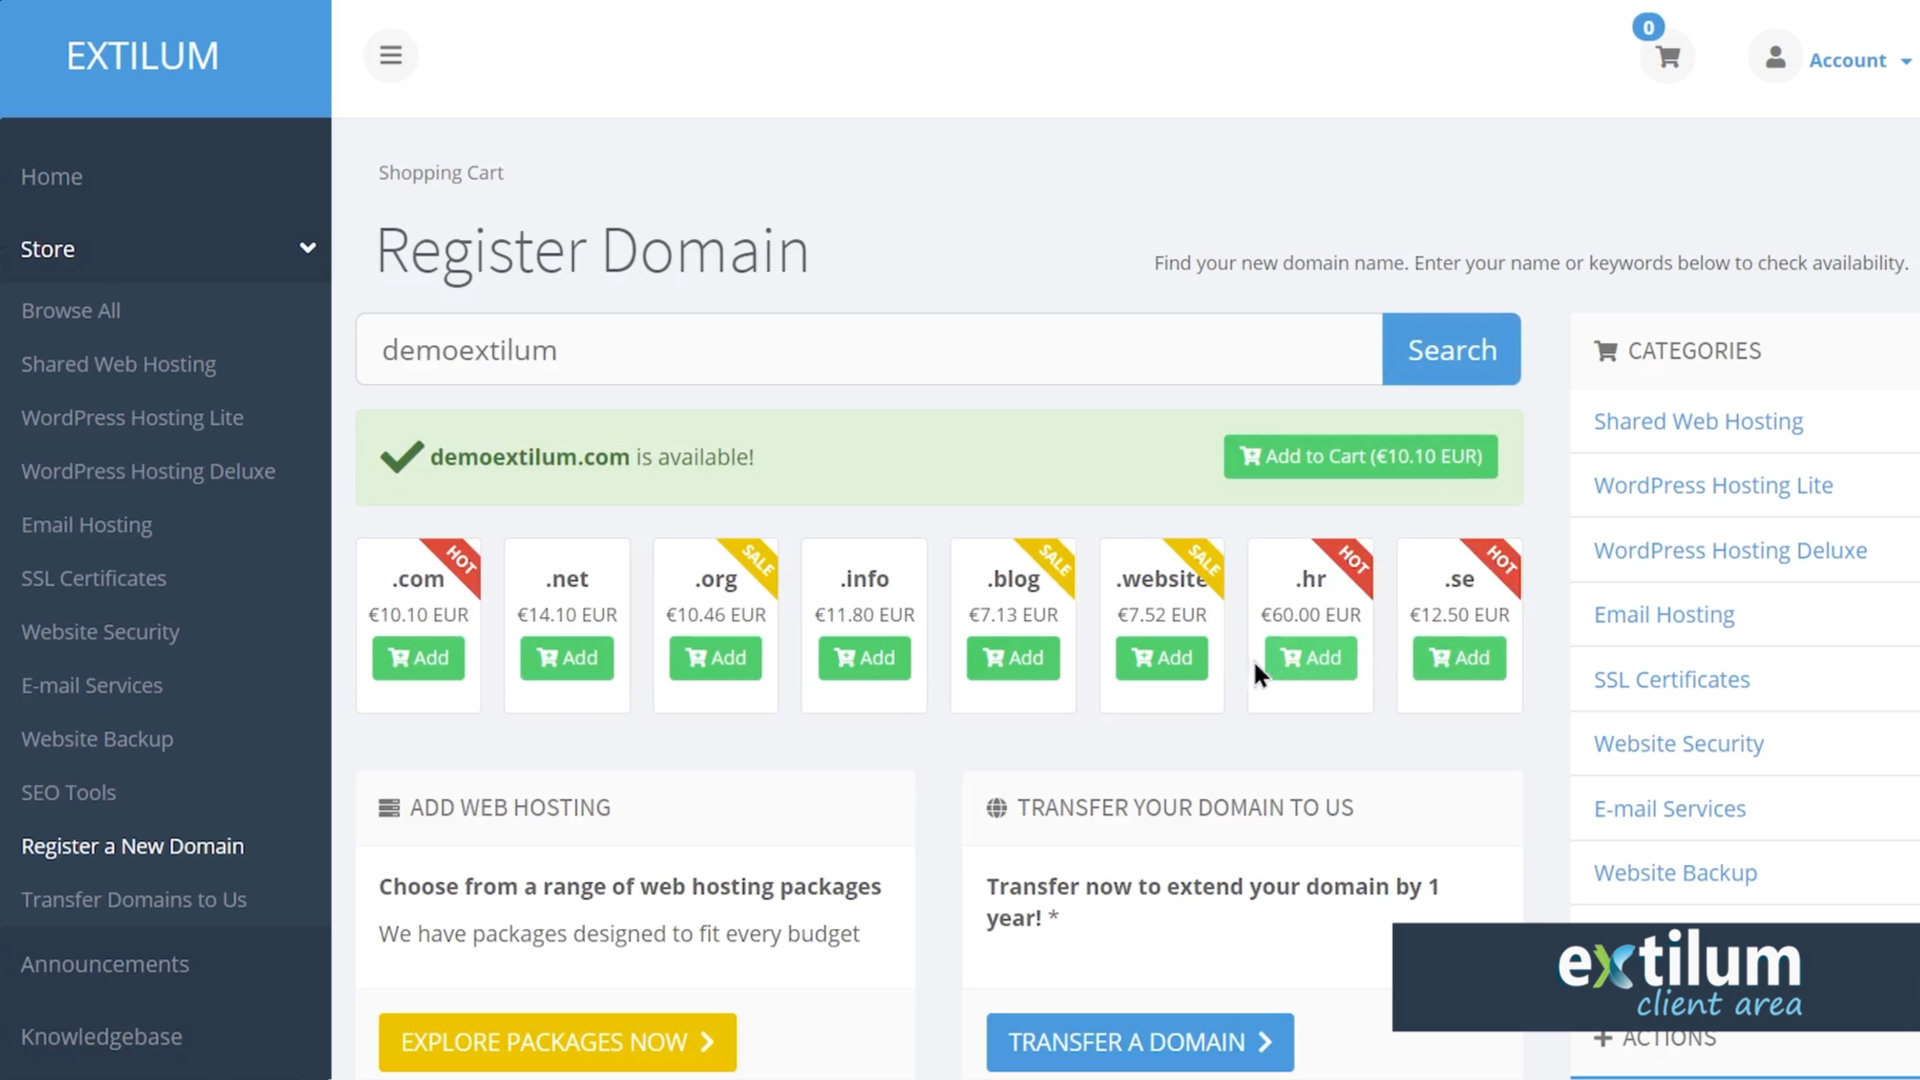
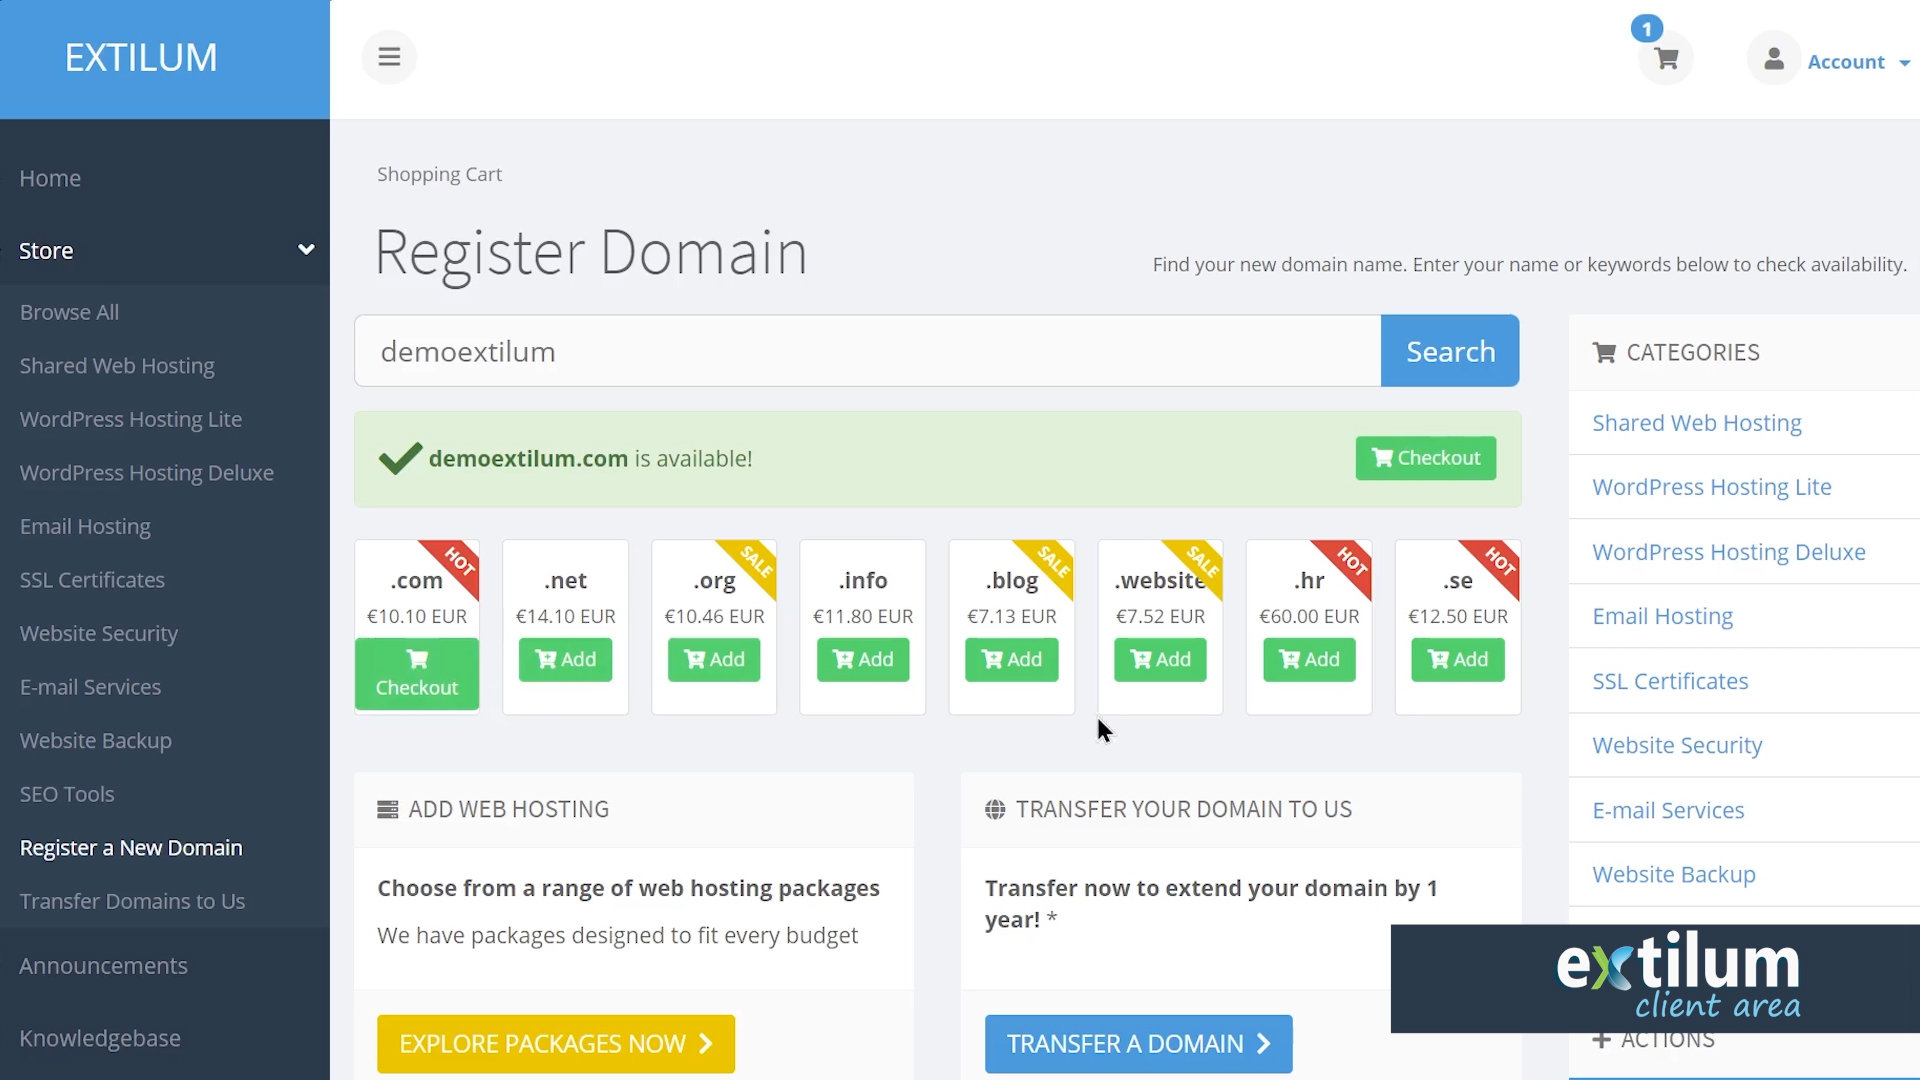
- If finished, go to Checkout.
- Domain Configuration
Here you can make any addons to your domain that you wish.
Hosting
Add a hosting package, explore our affordable webhosting packages and choose one that best fits your needs.
– click the Add button.
Addons
DNS Management
With this module, you can now set up the complete DNS for your domain right within Extilum.
ID Protection
We added ID Protection for domains so none of your personal details will show in the WHOIS info for your domain.
Email Forwarding
With this easy addon, you can simply forward email from your domain to your personal email account.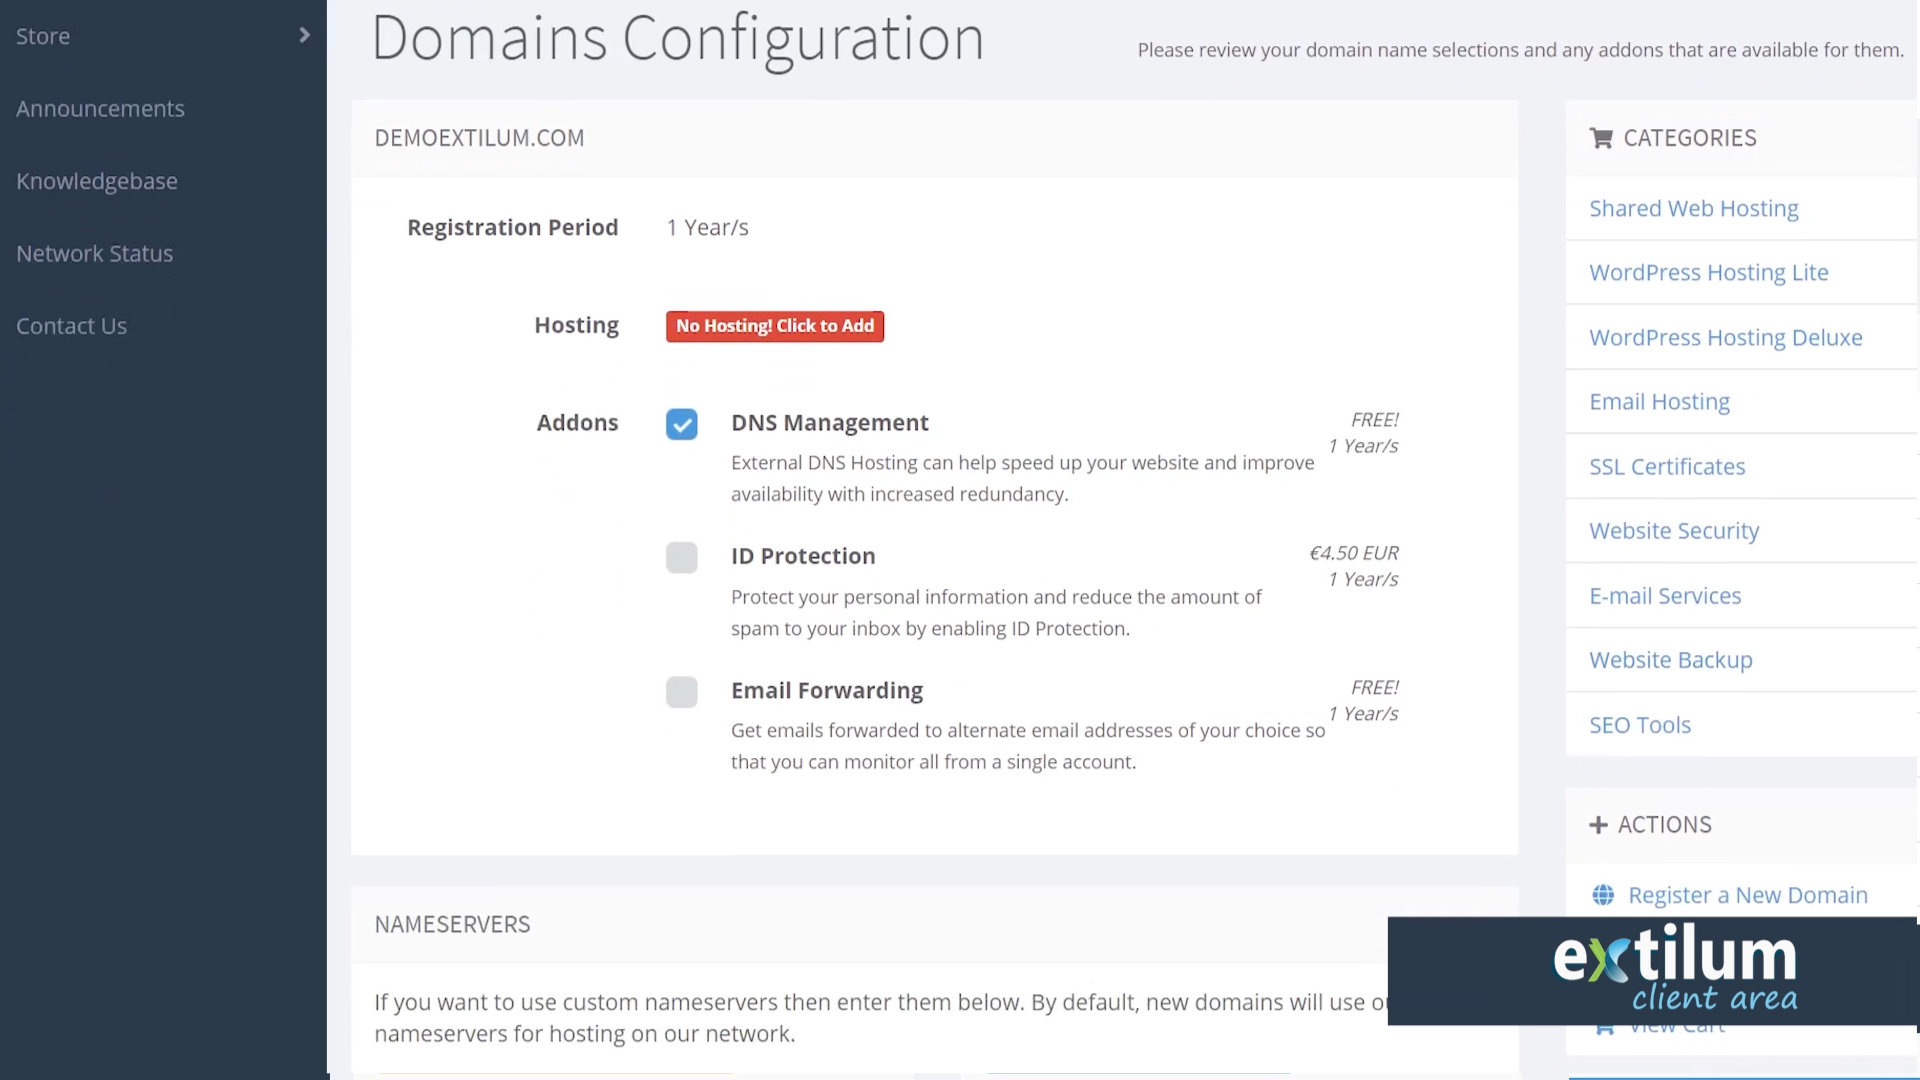
- Nameservers
Default nameservers
Use our default nameservers if you want to host your website with us.
Change nameservers
You can choose to set up your own custom name servers or point your domain to name servers with a web hosting provider.
Before editing your nameservers, you need to know the new nameserver records to use.
Contact your web host for this.
Nameservers will usually look like ns1.extilum.net and ns1.extilum.net. Some web hosts use IP addresses instead.
It can take a few hours for nameserver changes to take effect. Please be patient, if your website isn’t showing up at your domain right away.
You can change this information later on. There is no problem leaving it as is for now, if you are not sure.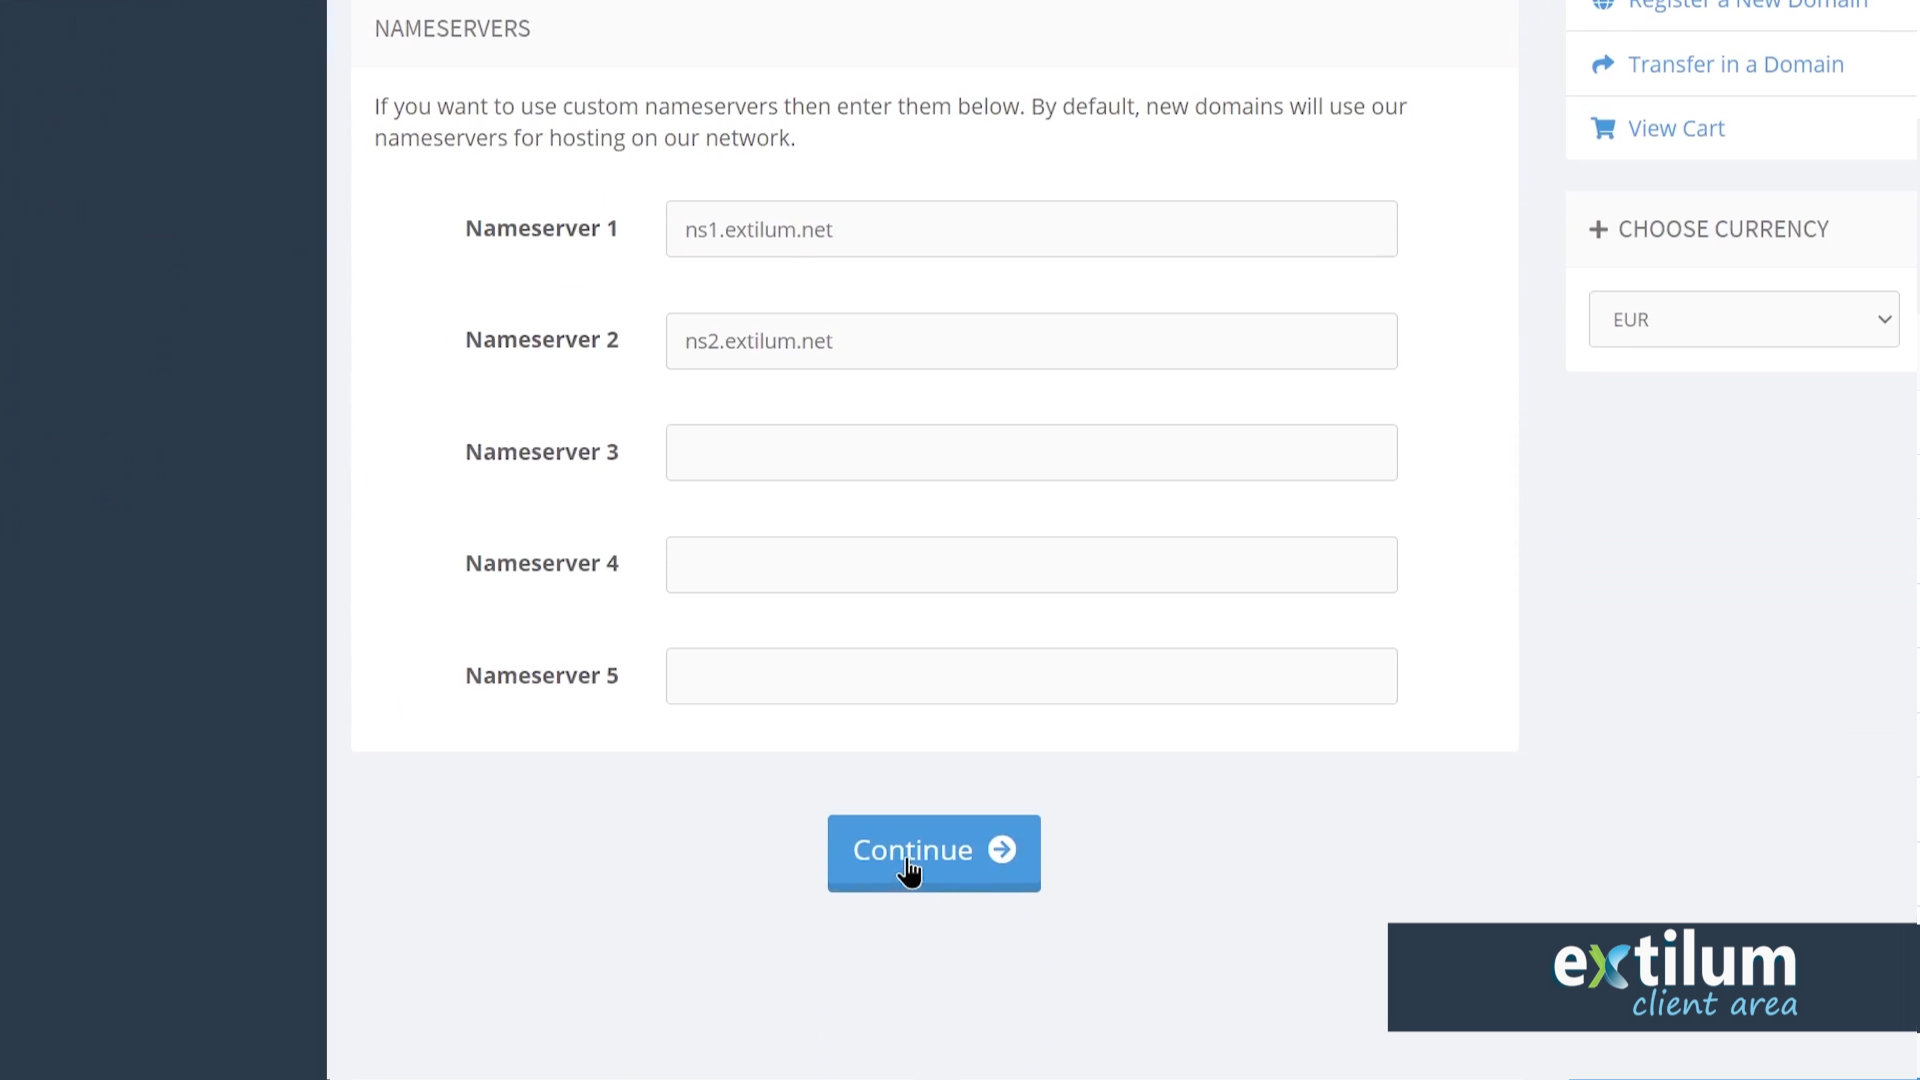
- Review & Checkout
Review Your Order, and You can still Edit it If You want.
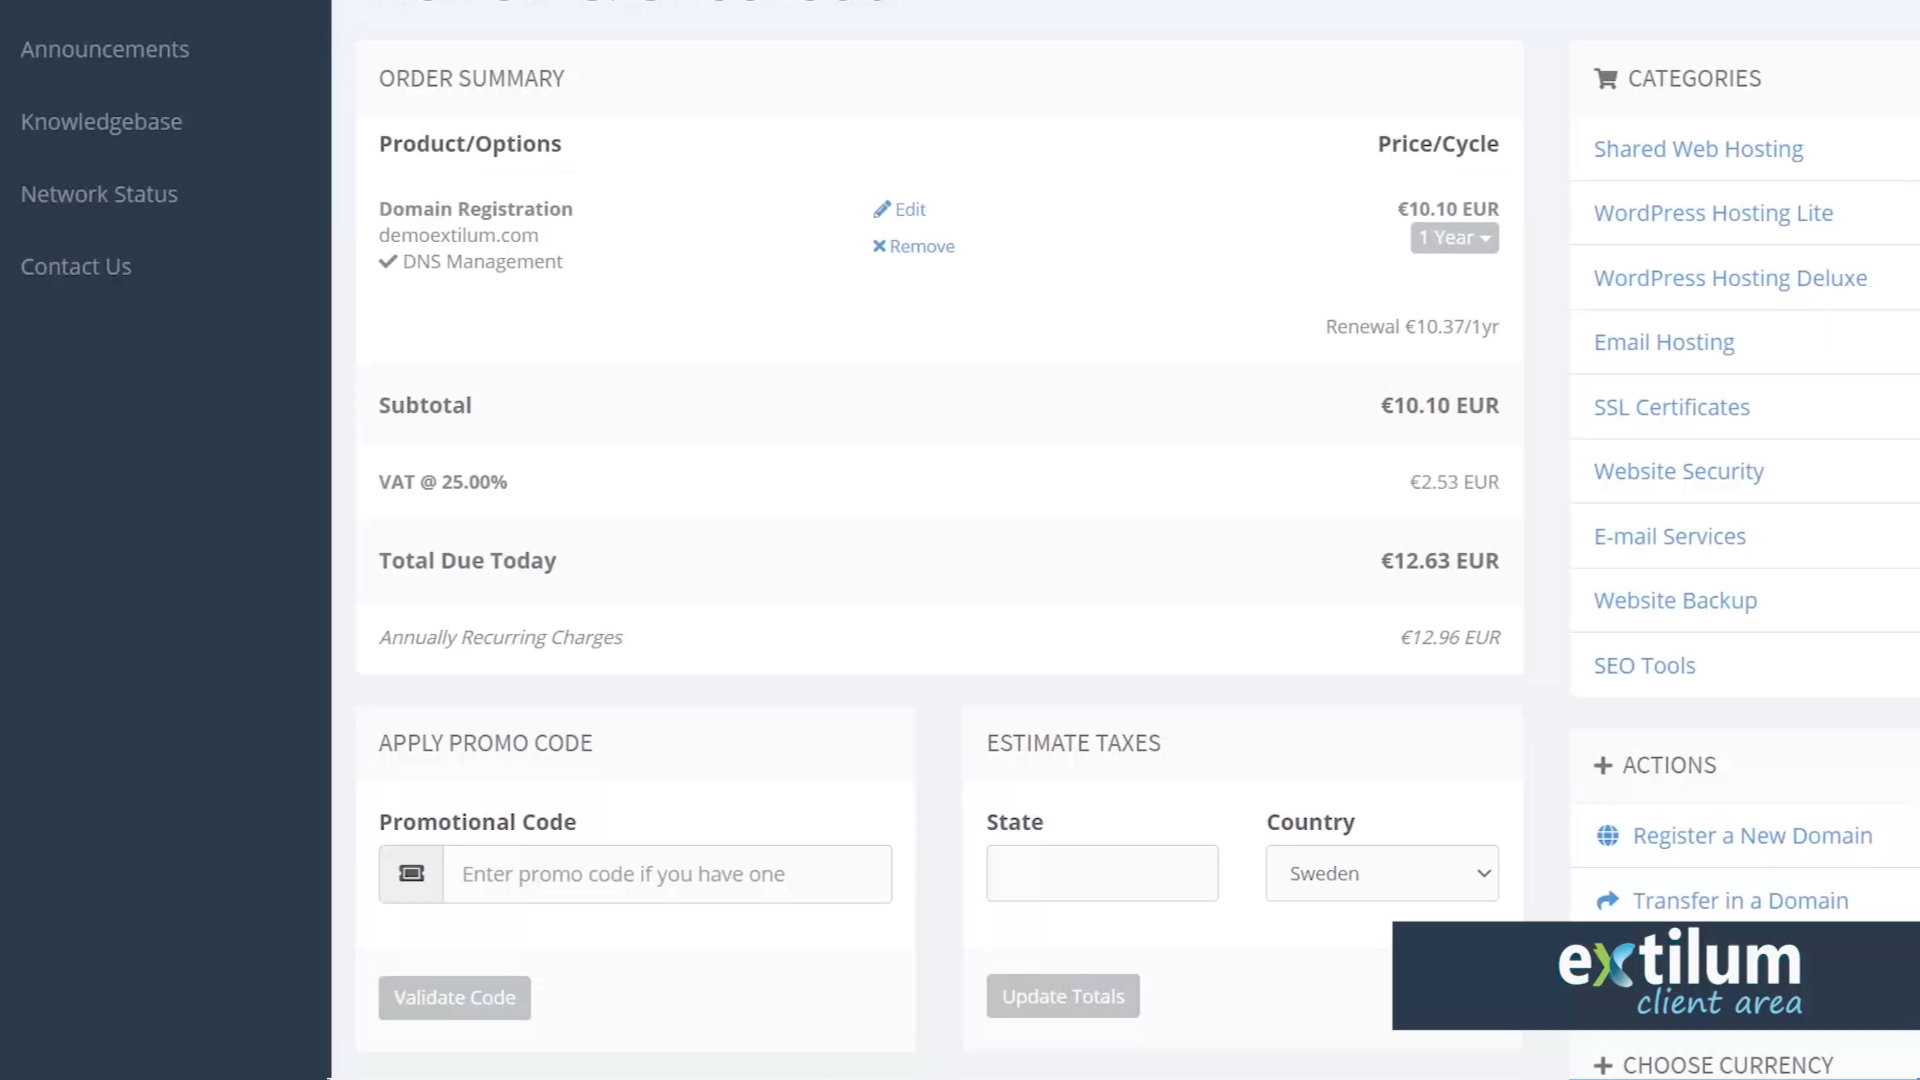
- Go to Checkout
Estimate Taxes
Choose Your Country from Drop-down Menu to get a Tax Estimate.
+Choose Currency
Choose Your Preferred Currency from a drop-down menu. The section is located on the right under the Actions panel.
Click the Checkout button.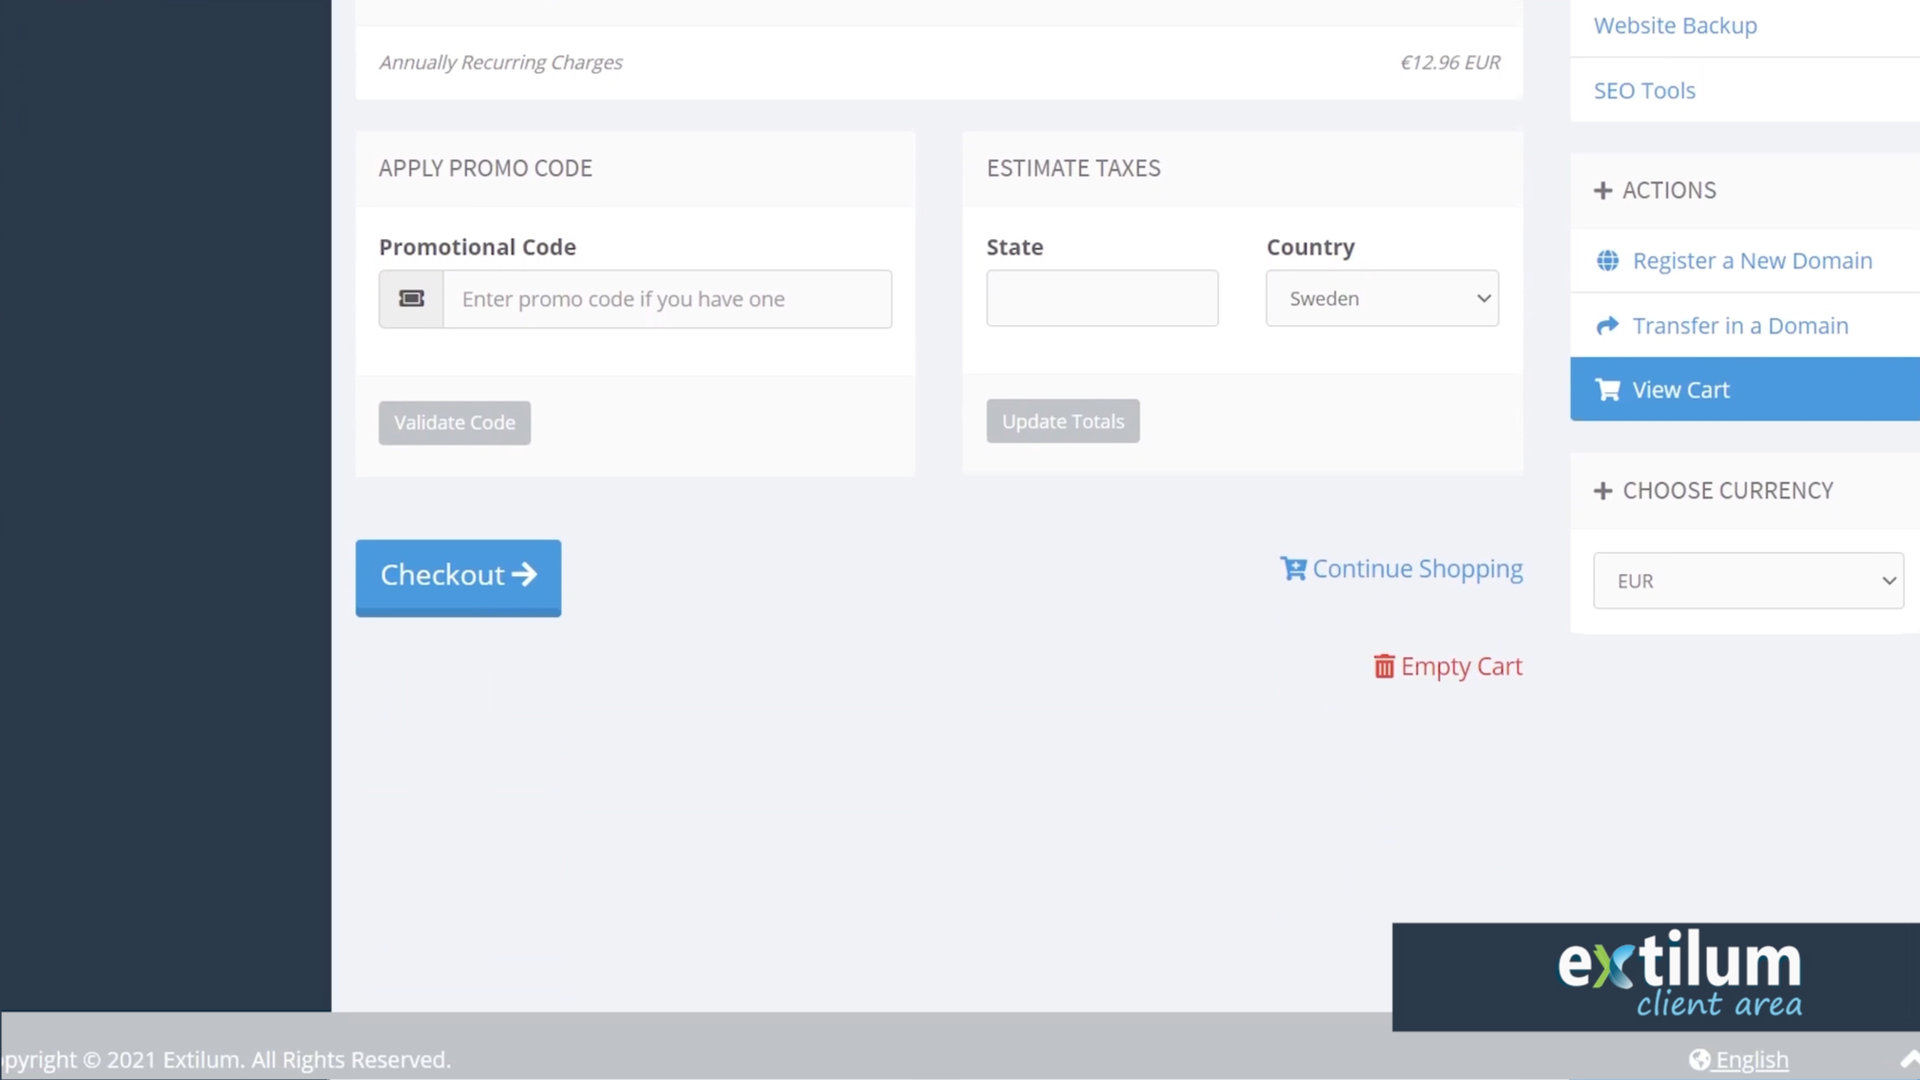
- Register before you make a purchase.
You Can Sign Up Using Your Facebook or Google Account.
Or
Fill Out Your Billing Details.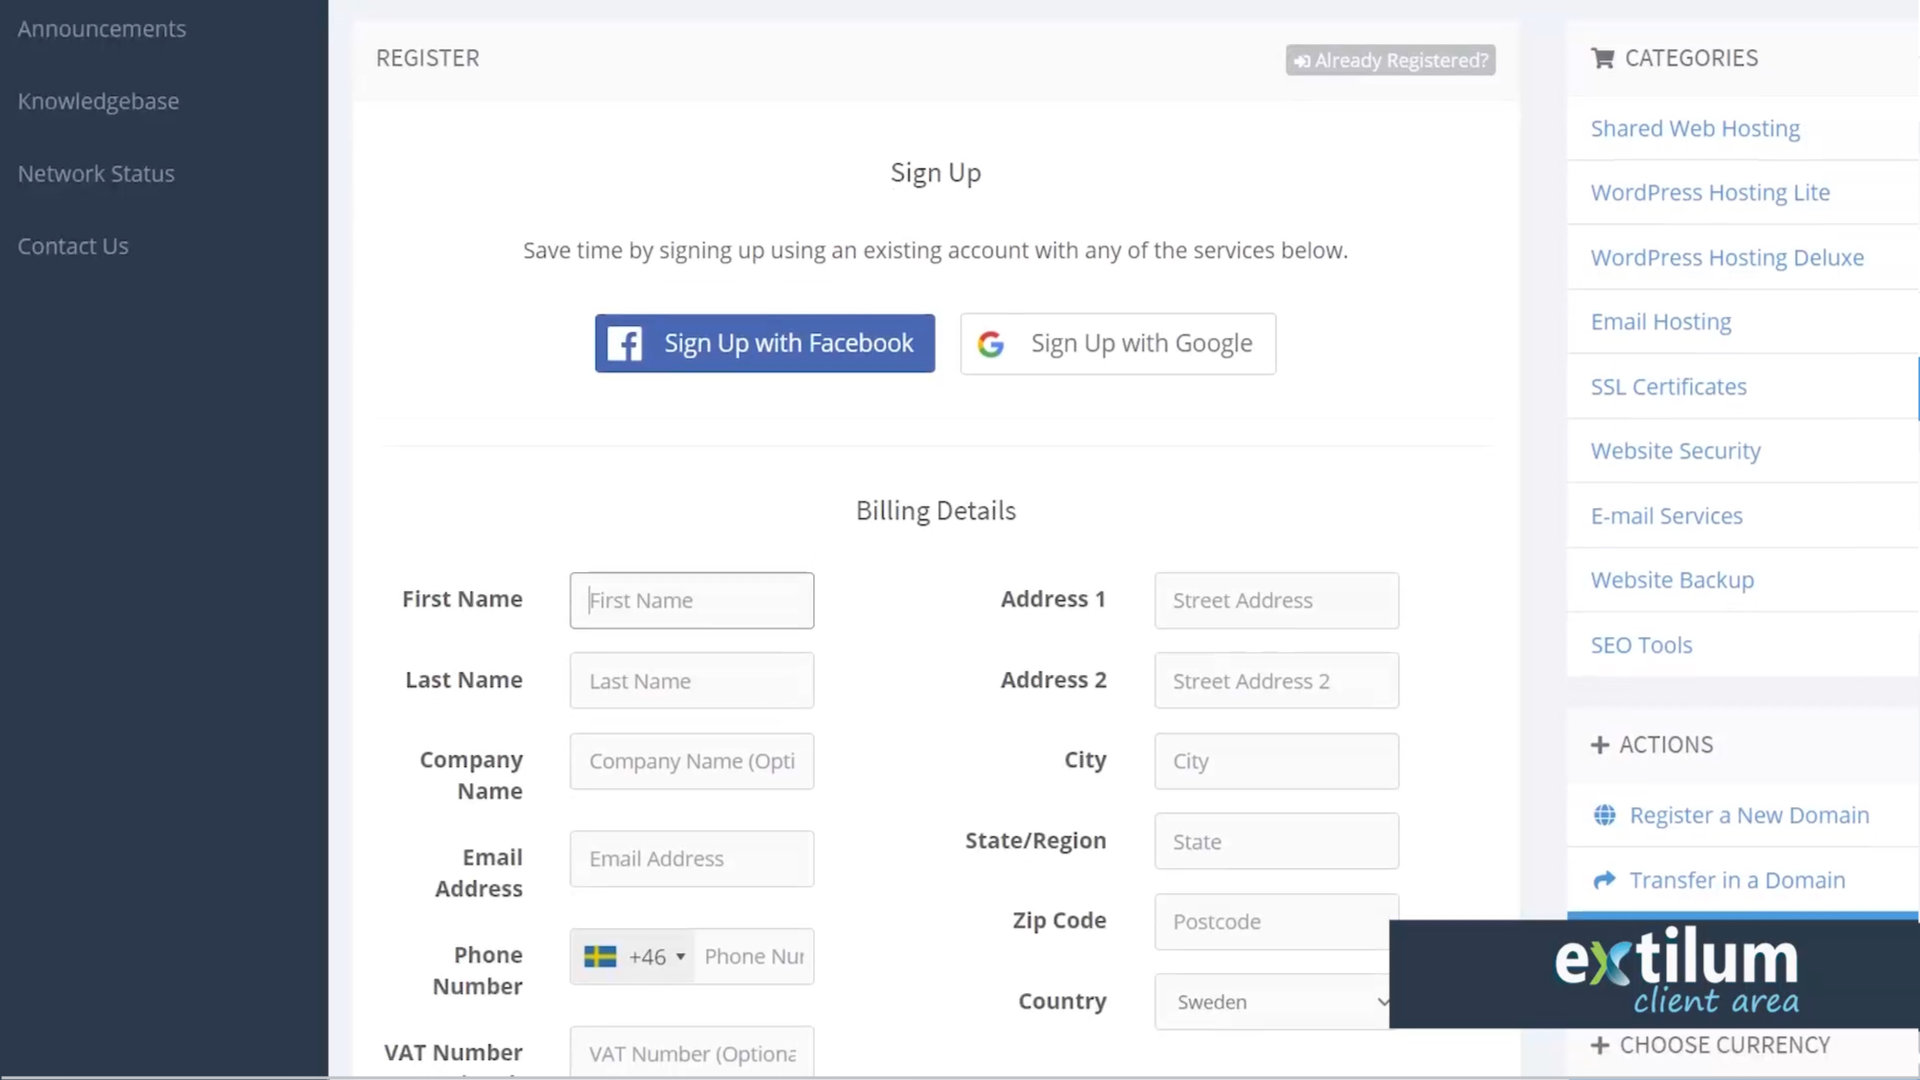
- Billing Details
Type Your Billing Information: First and Last Name, Address, Phone Number, Email Address, and more.
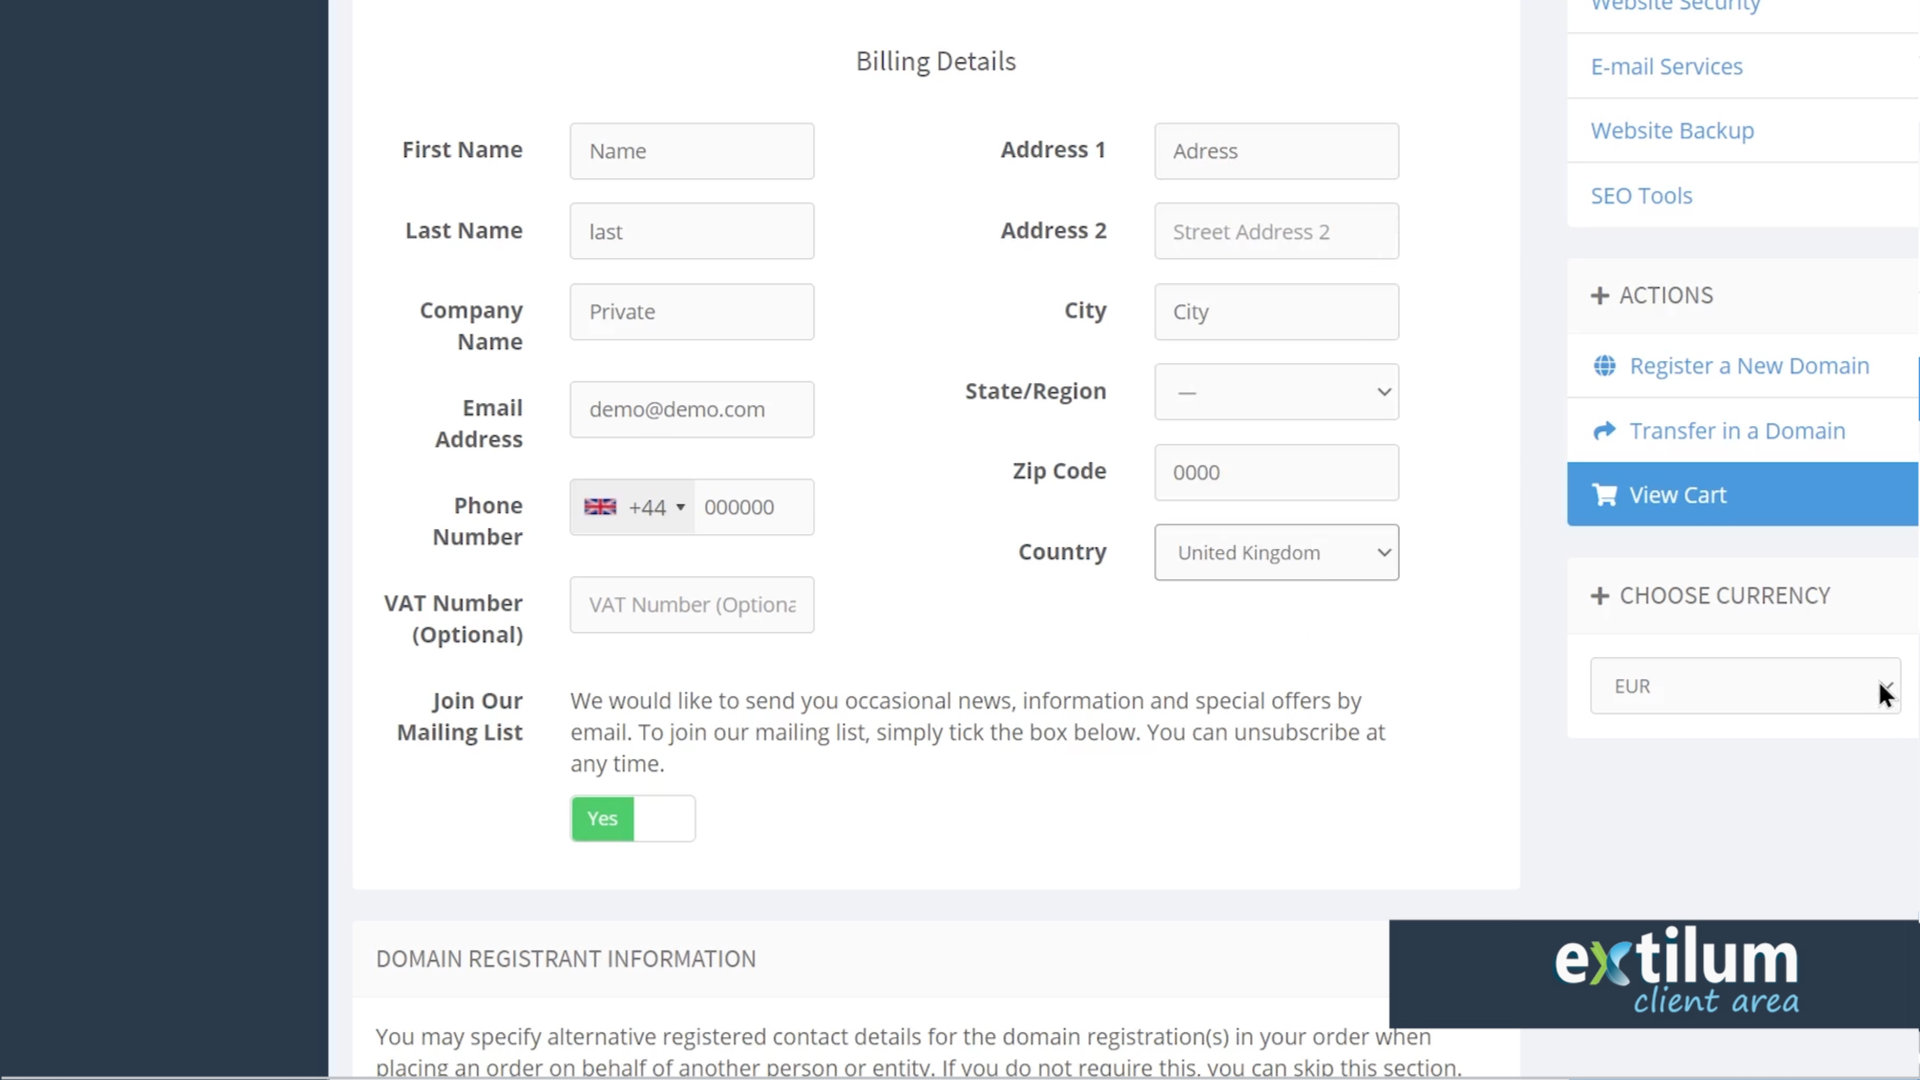
- Register
Domain Registrant Information
– Choose Default Contact
or
– Create a New Contact
Account Security
Password
— type the new password that you want.
Enter a secure password in the text box.
Password must have at least 8 characters, must contain at least three character categories among the following:
Uppercase characters (A-Z),
Lowercase characters (a-z),
Digits (0-9),
Special characters (~!@#$%^&*_-+=`|(){}[]:;”‘<>,.?/)
The system will evaluate the password that you enter on a scale of100. A weak password has 0 value, while a very secure password has 100 value. Or you can click Generate Password to let the system create a secure password for you.
Confirm Password
– retype the new password.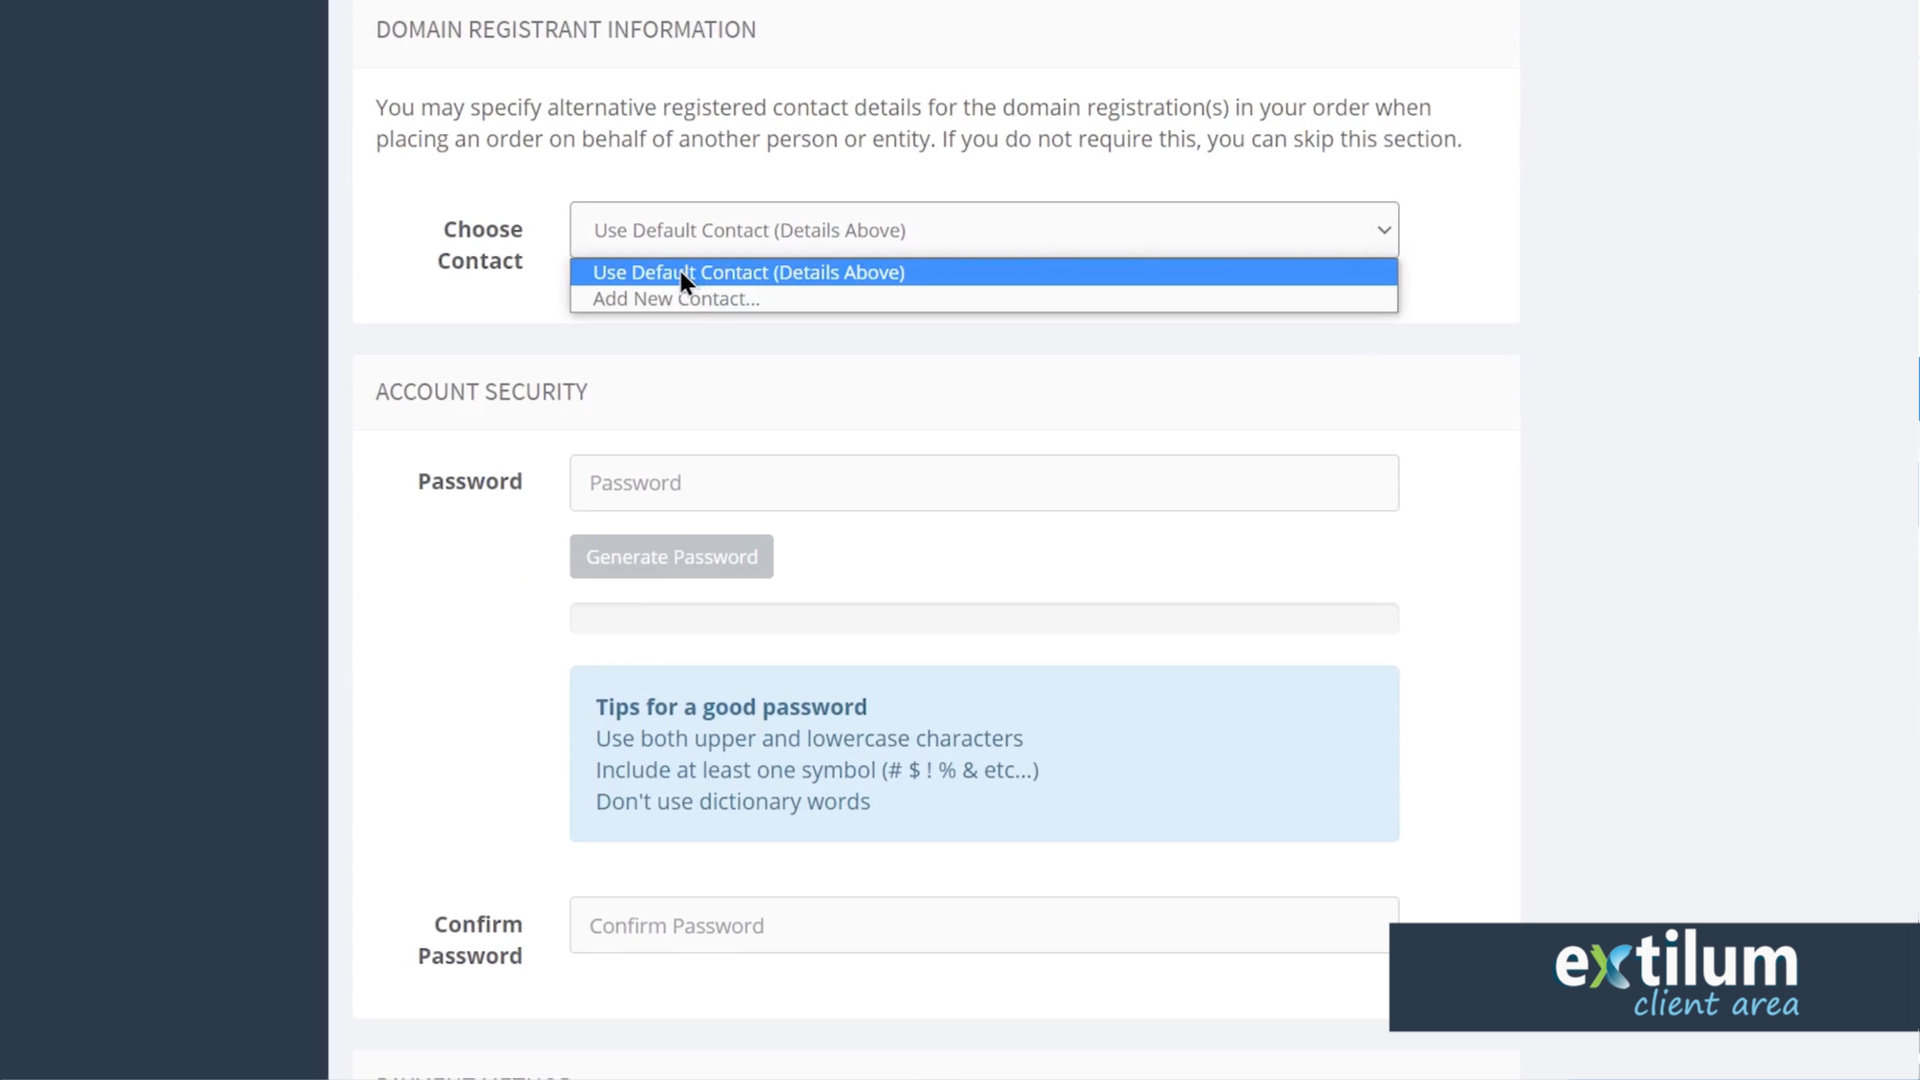
- Register
Payment Method
– Choose Your preferred Payment Method
Notes
Add any notes or additional information you want to include with your order.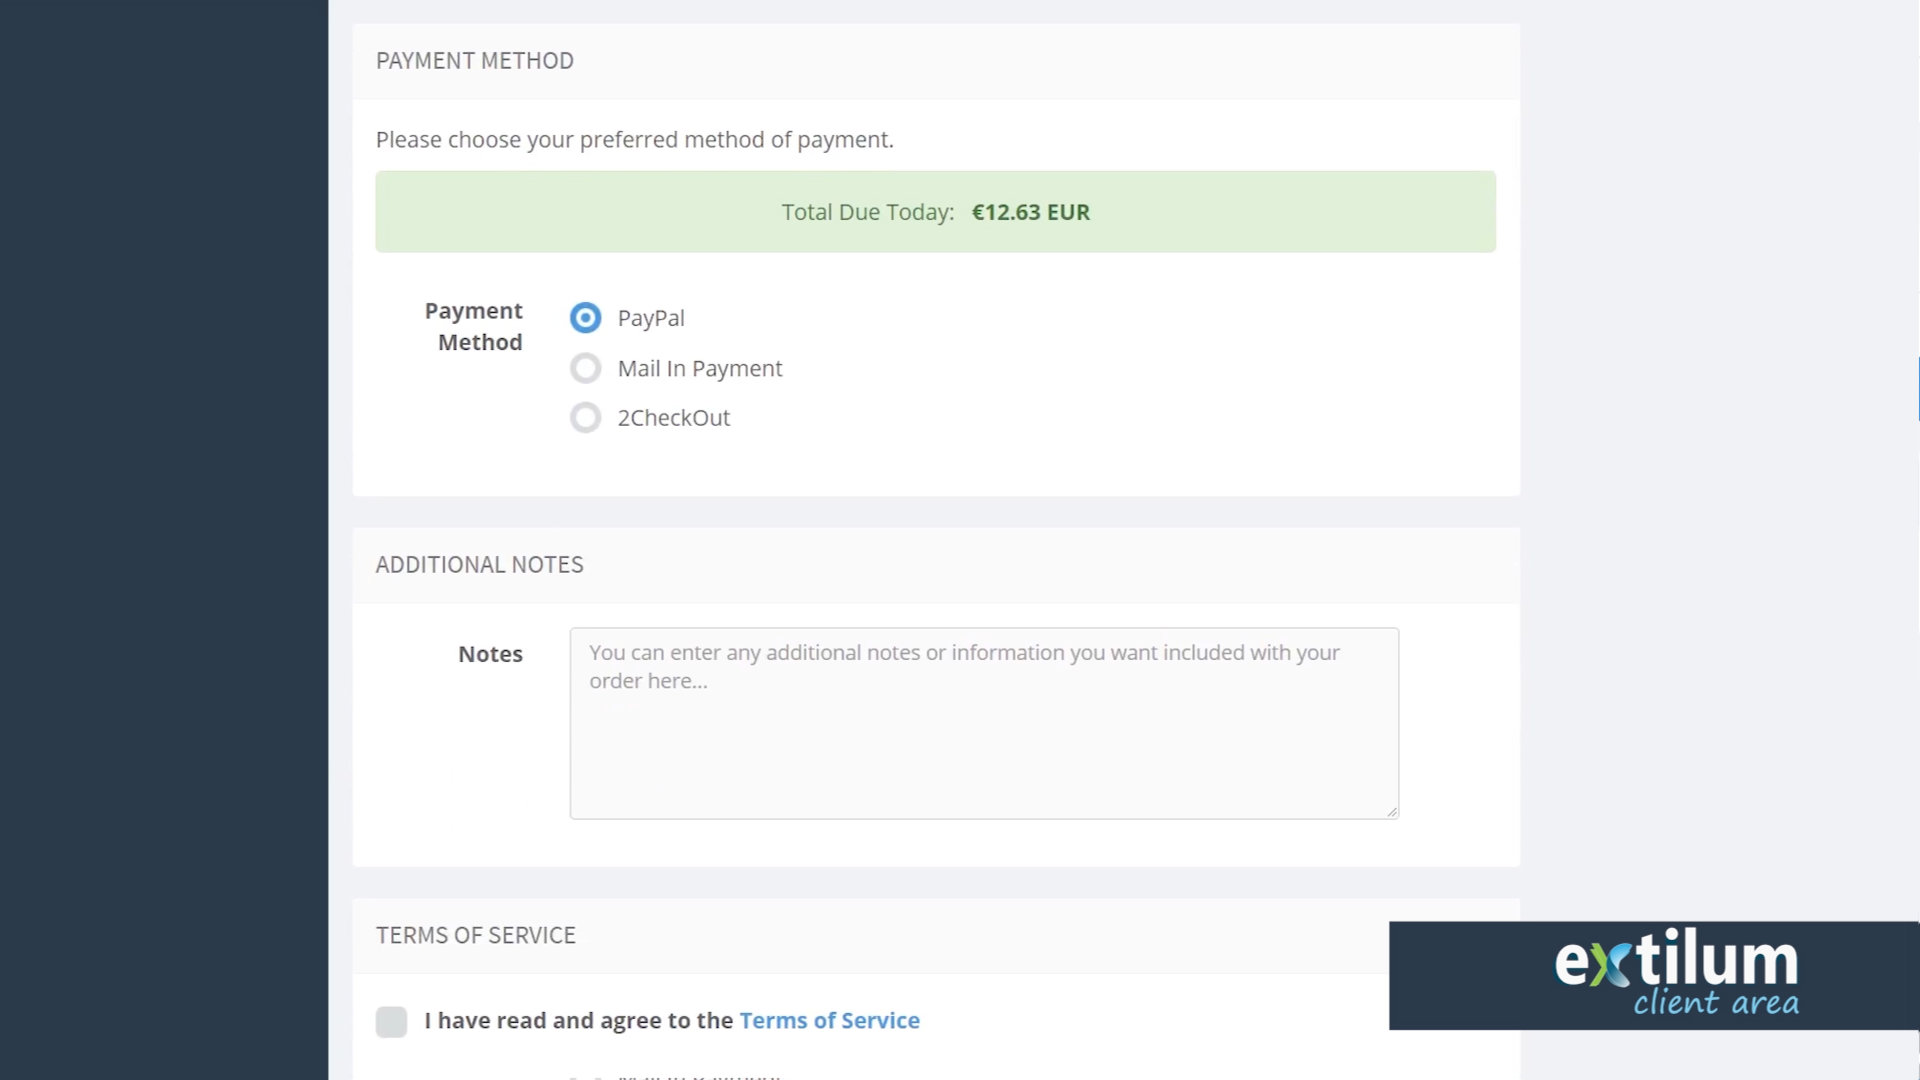
- Register
Please read our Terms of Service and select the statement: I have read and agree to the Terms of Service.
Click the Complete Order button at the bottom of the page.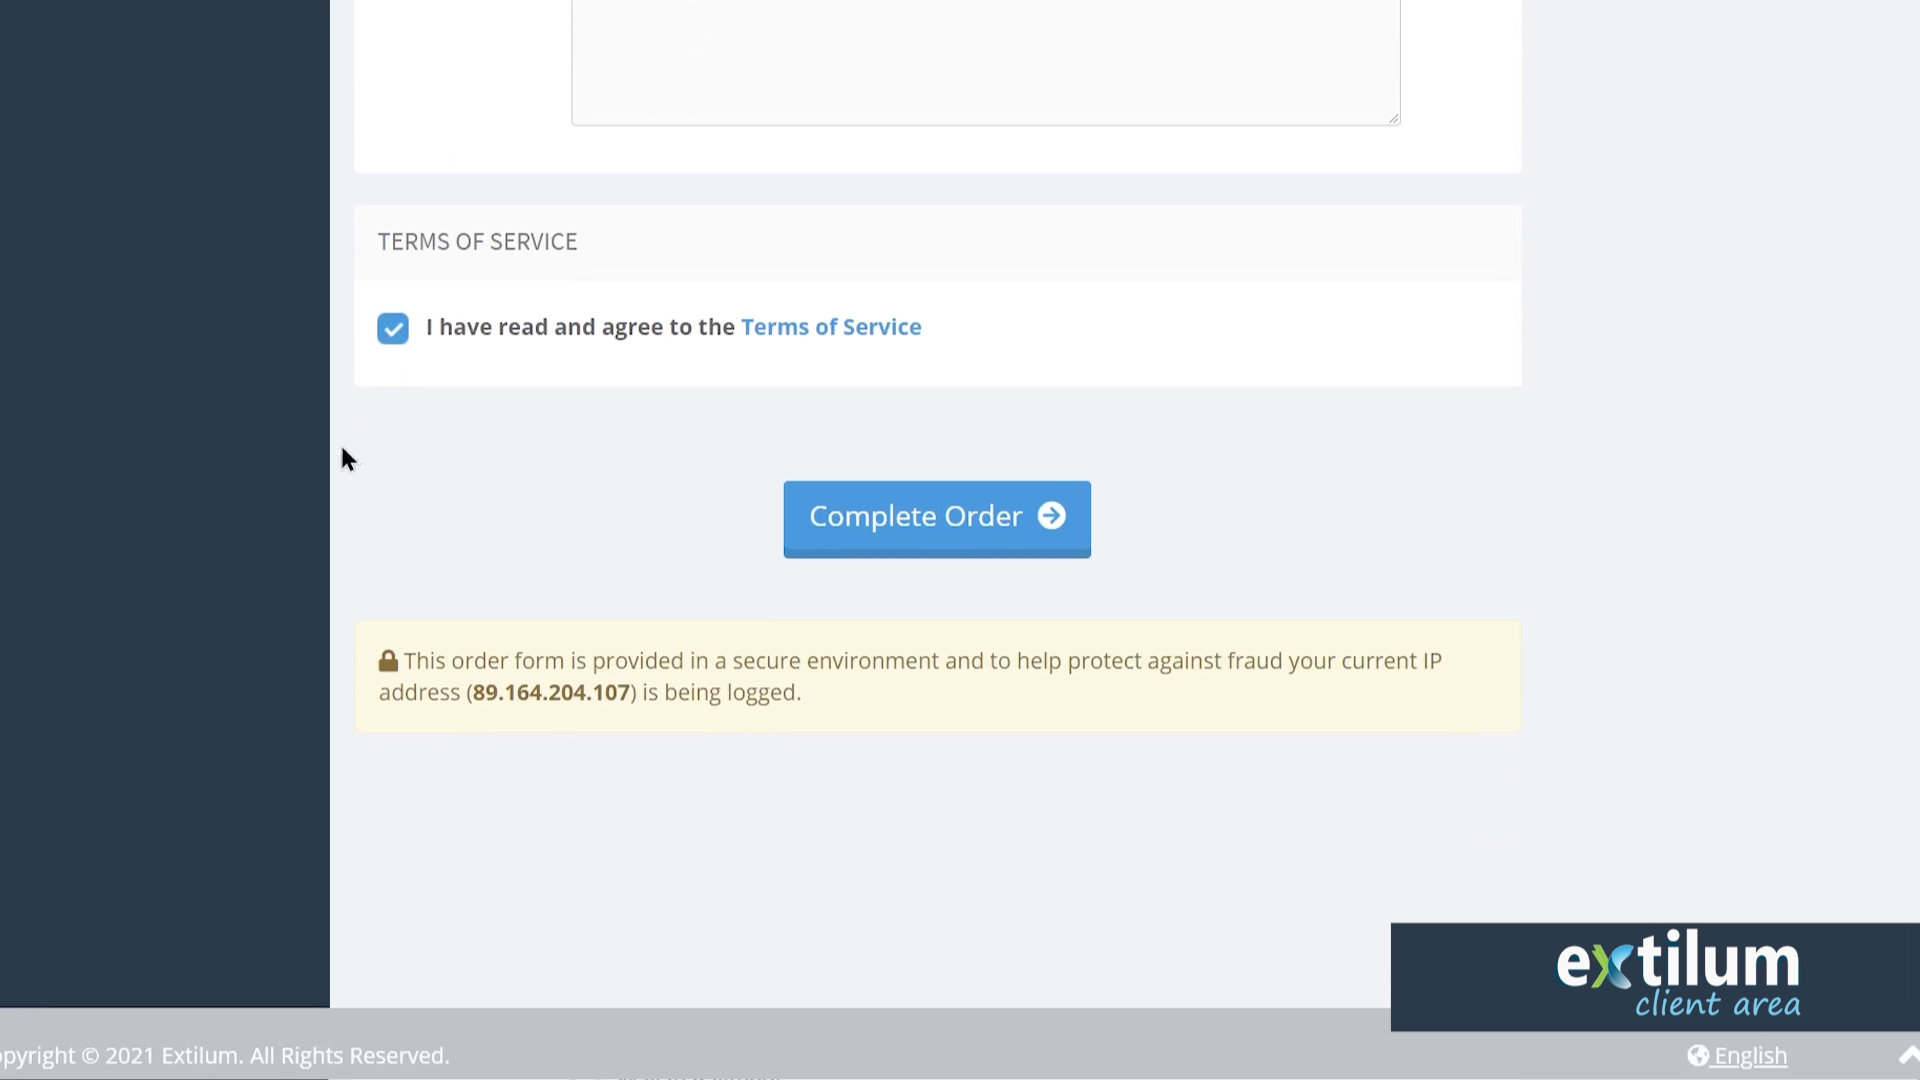
Related Articles
0 out of 5 stars
| 5 Stars | 0% | |
| 4 Stars | 0% | |
| 3 Stars | 0% | |
| 2 Stars | 0% | |
| 1 Stars | 0% |
